Thursday 15 March 2012

Outlook 2007 - Requested Operation Failed


1. Reset the Outlook toolbar template. With Outlook close, do a search for and rename outcmd.dat file. Restart Outlook.

In Windows XP Outcmd.dat is located in C:\Documents and Settings\<user>\Application Data\Microsoft\Outlook folder. In Windows Vista, file is located in C:\<user>\AppData\Roaming\Microsoft\Outlook folder. It is a hidden file, so you have to unhide hidden files. Go to any folder and select Tools > Folders Options > View. Check "Show hidden files and folders". Click OK.

2. Register an important Outlook file. Go to Start > Run and type regsvr32 OLE32.DLL
Do the same for INETCOMM.DLL

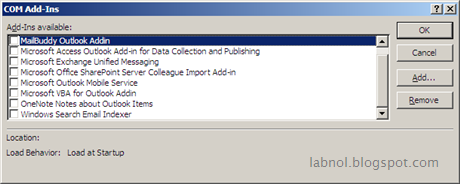
3. If no joy, an addin could be corrupt. Disable Outlook Addins.  Go to Tools > Trust Center > Add-Ins
 disable the addins.

4. Check if an external program running in the background is interfering with Outlook. Check Firewall, antivirus, antispyware, antispam, and all Norton programs. Disable these programs one at a time.

5. Create a new Outlook profile.
http://support.microsoft.com/kb/829918

6. If no joy, reinstall Outlook.  Go to Add/Remove Programs and highlight Microsoft Office. Click on Install/Uninstall.  A menu will pop allowing you to choose repair or reinstall.

Wednesday 14 March 2012

Configuring Outlook for Rediff Mail

Please follow the steps below for configuring Rediff mail in outlook 2007.

1. Rediff does not give POP3 access by default. You need to buy the POP3 access from rediff and it will costs you INR 399.00 per year. To buy rediff POP3 access, login to your rediffmail, click on settings at the top right corner and click POP3 Access.

2. Now go to your outlook, in the Tools menu select the Account Settings.

outlook-rediff

3. In the next window, click the option New under Email Tab.


4. In the next window provide the information as below:
  • Your Name
  • Your Rediffmail Address
  • Your Rediffmail Password
  • Select the check box Manually configure the settings and click Next..

rediff pop3

rediff pop3

rediffmail pop3

Fill your Name, Email Id and the Password. Select the accout type POP3.
Incoming mail server: pop.rediffmail.com
Outgoing mail server: smtp.rediffmail.com
Now click on the More Settings in the bottom left corner.
In the new window go to Outgoing Server and select the check box as as shown below.

rediffmail in outlook

Now select the Advanced tab and select the check box "Leave a copy of messages on the server".

outlook for rediffmail

Save and finish the settings. Your Rediffmail is now ready to use in outlook !!!

Saturday 10 March 2012

Disable the Annoying "This page has an unspecified potential security risk" When Using Files on a Network Share

Have you ever right-clicked on a file from a mapped share and gotten this really irritating popup message from Windows? Even more annoying, when you try and drag and drop files from a network share, you get another popup asking “Do you want to move or copy files from this zone?” So what’s the deal?

The Problem
Whenever you try and right-click on a file, like a zip file, you’ll get an irritating popup: “This page has an unspecified potential security risk. Would you like to continue?” It’s even more annoying cause, well, I’m NOT using Internet Explorer!

image

The problem gets worse… if you try and drag/copy files out of the folder you’ll get the error “Do you want to move or copy files from this zone?”


Very annoying indeed!

The Reason
You are getting this error because Windows is not detecting your local network properly, and assuming that there is a security risk. This all goes back to the concept of “Security Zones” that you might have seen if you’ve ever looked in Internet Explorer’s options panel.
In order to prevent rogue websites or applications from passing a UNC path as a link to run an application, Windows will detect that a UNC path (like \\computername\sharename) is not part of your local network, and prompt you before doing anything that could be unsafe. This security mechanism is definitely annoying, but it really is a necessary evil.
What we’ll do is manually add the mapped drive computer name to the exception list.

Fixing the Problem
You’ll need to open up Internet Options from Internet Explorer’s Tools \ Options menu, or from the Control Panel. Once there, select the Security tab, click on the “Local intranet” icon, and then click on the “Sites” button.


If you only map drives to a few machines, what you can do is click on the “Advanced” button, and then add each machine name with this format:
file://computername
For instance, the name of my file server is superfast, so I put in file://superfast and then clicked the Add button. (Make sure to click the Add button!)


If you have a number of machines on your network, you could alternatively uncheck the “Automatically detect intranet network”, and then check the other three boxes. This prevents you from having to enter each machine name manually, but allowing all network paths is probably not the most secure method, better to manually enter the machine name as detailed above.


Note: I was completely unable to use this method to remove the security popups when using an IP address to map drives. You’ll need to switch to using the computer name when mapping drives in order to remove the messages. Technically we could remove the security popups across the board using the Custom Level button, but that would leave your computer with a security hole, so I’m not going to explain it.
Now that we’ve added the exception, you can right-click on the file without any issues:


You can also copy files and generally interact with the network share without problems.
Note that this should also work in Windows 7.

Friday 9 March 2012

How To Create and Use a Password Reset Disk or USB In Windows 8

image
Forgetting your password can be very frustrating, however this situation could be completely alleviated if you always had a password reset disk handy. Lets see how we can create one in Windows 8.
Note: This will only work for local user accounts, if you chose to sign in with a Live ID, you will have to reset your password using an alternative method.

Creating a Password Reset Disk

Press the Win+F key combination to bring up the Search page, here you will need to switch over to the Settings section.

Now search for User Accounts. You will need to select the first result.

This will take you to the User Accounts section of the old control panel. Here, you can select the link to “Create a password reset disk”.

You will be greeted with a Wizard, make sure that your USB is inserted before clicking next.

Now you can select the USB that you want to create the password key on, then click next.

You will then be asked  for your current Windows password.

That’s all there is to creating a a reset disk, since anyone could use this to gain access to you machine you will need to store it in a safe place.

Resetting Your Password

Once you have a password reset disk, you can use it easily the next time you forget your password… once you’ve typed the wrong password Windows 8 will show a “Reset password” link below the login box.

At this point you should have your USB already plugged in, so go ahead and hit the Reset password button, this will kick off a wizard, click next to continue.

You’ll want to pick the right disk if you have more than one.


Now you will need to type a new password, and of course a new hint for your password.


That’s all there is to it.


Now you can store the USB key somewhere safe, so that next time you forget your password you have it handy.

Fix Your Broken Outlook Personal Folders (PST) File

If you use Outlook and you’ve noticed it being excessively slow or just having errors, you should probably scan and repair your Personal Folders file for any problems. It’s sorta like checkdisk for your email.
Repairing Your PST File
To repair your PST file, you’ll have to open the Scanpst.exe utility that’s included by default with Outlook. The only problem is that there’s no shortcut to it, so you’ll have to find it in the Outlook folder.
Open up explorer and then browse down to the following folder for Outlook 2007:
C:\Program Files\Microsoft Office\Office12
Or one of these folders for Outlook 2003 and earlier (thanks to Mike in the comments):
C:\Program Files\Common Files\System\Mapi\1033
C:\Program Files\Common Files\System\MSMAPI\1033
image
Once you open up the utility, you’ll have to find the location of your PST file by clicking the Browse button. If you don’t know the location, there are instructions for figuring out the location further down in this article.

Click on the Start button to start the scan…

It will take a while to scan the file, and you’ll get a report at the end telling you whether you have errors in the file.

Click on the Repair button, and after a while you’ll finally get the “Repair complete” message.

If you are curious what was actually repaired during the process, you’ll find a text file in the same directory as your PST file with the same name as the PST file.

Most of the information in the file is pretty cryptic… so I’m not sure reading it will help all that much.

Find Your Outlook PST File Locaton
If you just have a single PST file created automatically by Outlook, there’s a standard location under your user profile directory. Open up an explorer window, and then paste in the following into the address bar:
%appdata%\Microsoft\Outlook

You should see your PST file in the list, usually called Outlook.pst at least in the later versions of Outlook. If you’ve created a new personal folders file, it might be in a different location.
Find Location of Outlook PST in Non-Standard Location
Sometimes your PST file will be in a different location, for a number of reasons.. for instance if you created a second PST you would have been prompted to save it somewhere.
If you can actually open Outlook, right-click on your personal folders location, and then choose Properties.

On the properties screen, click the Advanced button.

Now you’ll see the location of the file in the Filename field. As a bonus, you can also compact the folders from here (although you shouldn’t compact it until it’s repaired first)

It’s well worth it to scan your PST file every so often so you don’t lose data. Of course… you should be backing up your files as well.

Fix a PST File Automatically With Outlook’s Inbox Repair Tool

The Outlook ScanPst.exe .PST Recovery Tool

To get at it, you'll need to navigate to this path using Windows Explorer:
For Outlook XP & 2003: Hard Drive Letter:\Program Files\Common Files\System\MSMAPI\LocaleID (which is 1033 for the USA or similar)
For Outlook 2007: Hard Drive Letter:\Program Files\Microsoft Office\OFFICE12Now, inside this folder, you're looking for this particular setup file: "Scanpst.exe" When you run the .exe, you'll need to Browse... to your current .pst file and hit Start:

Scanpst.exe file selection

The Inbox Repair Tool will now scan the corrupted .PST file for errors:

Scanpst.exe file selection

If your PST file is recoverable, you'll see the repairable errors show up in the scan results. To fix them, select Repair.:

Scanpst.exe file repair

Transferring Recovered PST File Data to New PST File

Once the repair finishes, Outlook creates a "Recovered" version of your .pst file, and you need to tell Outlook to use it rather than the old, damaged or corrupted .pst file.Next, you'll need to point Outlook in the right direction, namely at the recovered .PST file: Start Outlook Normally Special Note: If Scanpst.exe wasn't able to repair the .pst data file, you may need a stronger repair tool. Try scanning it with the Stellar Phoenix PST repair utility. Select Go from the top menu, choose Folder List:

Scanpst.exe file selection

With the Folder List open, you should see a Recovered Personal Folders folder with the usual Outlook Personal Folders, or a Lost and Found option.If the Lost and Found folder has a file that the Inbox Repair Tool successfully fixed, it will show up here. If it's empty, the Repair Tool was unsuccessful.If you do see a fixed .pst file in the Lost and Found box, you'll need to create a new .pst file to move the repaired file(s) to. After you've simply dragged the files over from the "Recovered" .pst file to the newly created .pst file , you can turf the Recovered Personal Folders contents.

Microsoft Outlook Running Slow ? Fix the Problem

Is your copy of Microsoft Outlook running slow on your computer. Whether you are running a trial copy of Outlook or a licensed version, the performance of Microsoft Outlook 2007 software is much slower than even it's predecessor, Outlook 2003.

The software freezes during start-up, the status bar shows "Loading Dataset.." for minutes and you can perform almost no action on your email message unless that initial "Send/Receive" is complete.

If your work productivity is taking a hit due to the poor performance of Outlook, here are some suggestions and fixes to help you fix your slow Microsoft Outlook:

1. Disable RSS Feeds in Microsoft Outlook 2007

Outlook as RSS Feed Reader
Microsoft Outlook 12 installs with a set of RSS feeds - if you are not using Outlook to read RSS feeds, it's best to remove them from Outlook so that no resources are spent in synchronization of these feeds with the web.

Goto Tools - Account Settings - RSS Feeds. Select all the RSS feeds and hit the Remove button.

2. Disable Outlook Add-Ins You No Longer Use

Speed Up with Outlook 2007 Addins
Goto Tools - Trust Center and click the Add-ins tab. There's a GO button at the bottom of the dialog screen, click that button and uncheck (disable or even remove) the Outlook add-ins (like GoogleDesktop, iTunes Add-in, Acrobat PDF Maker, Mindjet Mindmanager, etc) that you no longer use.

[Do not disable the Windows Search Indexing addin]

If you have upgraded to Outlook 2007 from Outlook 2003 or XP, chances are that the old addin are not compatible with the new release and may be the reason behind the slugging performance of Outlook.

3. Reduce the size of your Outlook.pst personal folder.

Compact Outlook Data File
Delete any items that you do not want to keep like emails with really large attachments. You can remove attachments without deleting the actual message or archive the older items to a separate Outlook data file.

Now click Data File Management on the File Menu. Select the data file that you want to compact, and then click Compact Now in the Settings command.

Also see: Export and Backup Outlook PST to Gmail

4. Start Outlook 2007 in Safe Mode

If none of the above tricks, try running Outlook 2007 in safe mode (start -> Run dialog and type outlook /safe). The second option is to disable all your email rules and filters. And if Norton antivirus or Zone Alarm is configured with Outlook, disable that association. One of these actions should identify the culprit that's making Outlook to crawl.

It's likely that some of the tricks above would help in improving the performance of your Outlook 2007. If you are looking to improve the performance of Outlook 2003, try removing the MSN Messenger association with Outlook.