Thursday 10 August 2017

Enabling GST in Tally.ERP 9

Creating a Company

To create a company,
Go to Gateway of Tally > Alt + F3 > Create Company
  1. Enter the basic information, i.e., Name, Mailing Name and Address of the company, for e.g., National Traders and other relevant details.
  2. Select Singapore from the List of Countries in the Statutory compliance for field.
  1. Specify the E-mail details.
  2. The Currency Symbol for Indonesia will be displayed as S$ by default.
  3. In the Maintain field, select Accounts Only or Accounts with Inventory as per the company requirements.
  4. In the Financial Year from and Books beginning from fields, the first day of the current financial year for e.g., 1-4-2008 will be displayed by default, which can be changed as per requirement.
  5. Set the option Disallow opening in Educational mode to either Yes or No as per requirement.
  6. Enter the TallyVault Password if required.
  7. Set Use Security Control field to Yes if required.

  1. Press Y or Enter to accept and save.

Enabling GST in F11: Features

Go to Gateway of Tally > F11: Features > F3: Statutory & Taxation
  1. Set Prepare & Follow Singapore Style GST Returns to Yes
  2. Enter the GST Registration Number and the Company Registration Number

  1. Accept the Company Operations Alteration screen


Block Or Unblock Websites without software.


Many times in schools, colleges & offices surfing some sites like orkut,etc are banned !
To overcome this you can unblock these or block some other websites and play pranks !


Do The Following :
For eg you want to block www.xyz.com !

* Open the folder C:\WINDOWS\system32\drivers\etc
* There you will find a file named HOSTS
* Click on the file and press SHIFT and now right click on it .
* From the right click menu select Open with .
* Now, select Notepad to open the file from the list !
* Now, in the file under the line 127.0.0.1 localhost add another line as 127.0.0.2 www.xyz.com.
* Now, File>>Save !

Now, open your web browser and try openning www.xyz.com , it will not load !

To unblock sites just do the opposite !

Trick To Create Table In Word


To create a table in Ms Word you can use this shortcut !

>> Just type : +======+=====+====+===+==+=+

>> And simply hit 'Enter' !

>> You will see that the text changes to a table. Here, the number '=' represent the number of characters in each cell !

Internet Explorer F12 Developer Tools - Enable or Disable

Through the Local Group Policy Editor
1. Open the all users, specific users or groups, or all users except administrators Local Group Policy Editor for how you want this policy applied.

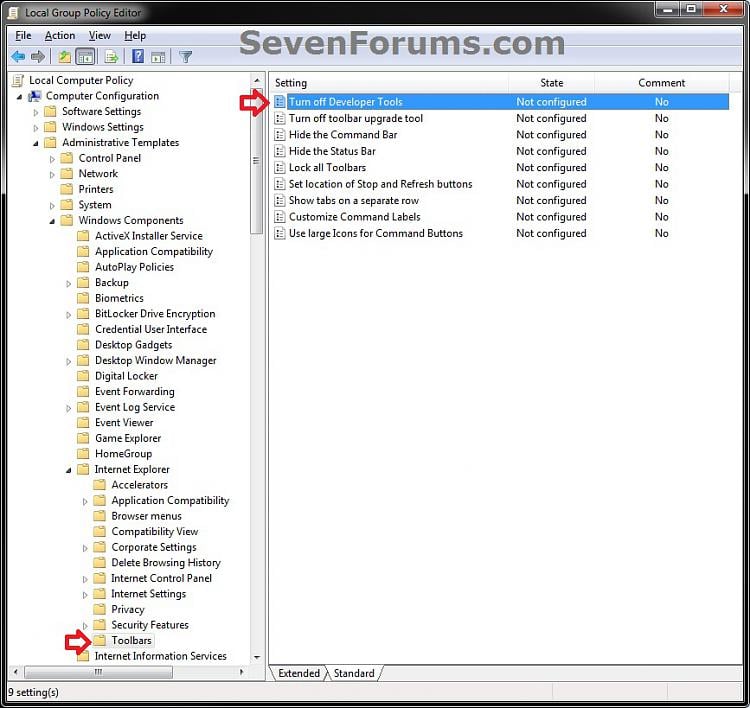
2. In the left pane, click/tap on to expand User Configuration, Administrative Templates, Windows Components, Internet Explorer, and Toolbars. (see screenshot below)
Internet Explorer F12 Developer Tools - Enable or Disable-gpedit-1.jpg
3. In the right pane, double click/tap on Turn off Developer Tools. (see screenshot above)

4. To Enable F12 Developer Tools in IE8, IE9, IE10, and IE11
A) Select (dot) either Not Configured or Disabled. (see screenshot below step 6)
NOTE: Not Configured is the default setting.

B) Go to step 6.
5. To Disable F12 Developer Tools in IE8, IE9, IE10, and IE11
A) Select (dot) Enabled. (see screenshot below step 6)
6. Click/tap on OK. (see screenshot below)
Internet Explorer F12 Developer Tools - Enable or Disable-gpedit-2.jpg
7. Close the Local Group Policy Editor window.

8. If open, close and reopen Internet Explorer to apply.


Restore / Recover from Virus that hides files and creates shortcut or .Exe application in Their Place

7 comments

      Many Viruses out there, hide your Folders and create Shortcuts or Application of the same name and same Icons as the Folders in the same directory. Many times people follow these shortcuts and end up infecting their system with this annoying virus.
      If you find any trace of this virus in your Flash/Pen Drive, External Hard-disk and other forms of Removable Disk, Then this quick tutorial should help you get your files back into place.

  • Windows 7 and Vista: Click Start in the search program field type CMD right click and Run as Administrator....
  • Type your Removable Storage Drive letter followed by colon and ENTER key. eg I: 
  • drive-letter: attrib *.* /s /d -h -r -s to make visible all files  (for more info, try attrib /?) or continue reading for a more detailed outline.
1.    Your Flash Drive should look like this when infected. (As you can see all the Folders have been hidden with only fake shortcuts leading to the virus).
2. Go to Folder Options: (on Windows 7: press alt first), click Tools ----> Folder Options: goto Views tab.
                                                                                      
3. Click Don't show hidden files, folders or drives and un-check "Hide protected operating system files". But If you're using Windows Xp and a virus has messed up you hidden folder options, then proceed to the command line step. 

4. Your Drive should now Display the hidden files.  Right click you desired folder and click properties.

5.  If the virus is one that just makes the Folders hidden and not System hidden( System Protected). Then the Hidden check box should be enabled and checked as shown in the image below (If not goto Command Line/Alternate solution section ). Just un-check the the Hidden tag and if you wish the Read-only tag too. but If it is shown as in step 1 of Command line section below:

COMMAND LINE SOLUTION / ALTERNATE SOLUTION


         If after the above steps your folder property is as shown below:  where the hidden tag is disabled and therefore, cannot be unchecked.
   
Follow the steps below:

STEP 1:  

Windows 7 and Vista: Click Start in the search program field type CMD right click and Run as Administrator.
               Windows XP: Click Start, click Run: type CMD and click OK.
                Or Goto Start------> Accessories------>  Command Prompt.

STEP 2:  

Type your Removable Storage Drive letter followed by colon and ENTER key. (eg I: )


STEP 3:  

Type Dir /A:H to display all hidden files (Note: will also display System protected files and Folders ), you can also use Dir /A:H to display only System protected files and Folders or Dir /A:HSD to display only System protected, Hidden Directories only.

STEP 4:

Type the Command as shown below, Make sure you type the attrib (attribute) command or you'll get an error. follow the System: 

attrib "File/Folder name" -h -r -s. 

Or  
attrib *.* /s /d -h -r -s to make visible all files (for more info, try attrib /?) 

STEP 5: 

After deleting the unwanted shortcuts or Fake applications. Your Directory should look like this.

How to Manually Create a Bootable USB disk for Windows 7 / 8 / 10 (UEFI / LEGACY)


Here is a tutorial on how to create a bootbale usb removable disk or flash for Windows 7, 8 or 10.

If you think an ISO file is a document for International Organization for Standardization, please stop reading here. :D
if your flash is already prepped up for booting in any of the chosen boot mode before, UEFI or legacy, you can skip to step 6.

The UEFI substage is for those installing in the modern UEFI 64 bit systems, while the Legacy mode substage is for those installing in the former/old systems with non UEFI partitions.

STAGE 1


0: backup the files in the removable storage, to avoid unnecessary data loss.

1. Goto start, type CMD or Command Prompt, rick click and run as administrator or ctrl + shift + left click / Enter.


2. In the command prompt window, type:
diskpart


3. List Disk
(Note the drive number of your USB disk)
select disk #
(where is the disk number).


4. Type Clean
NB. This will erase all partitions and data on the USB


5. Type create partition primary

6. Type List partition
NB: If you did not skip actions 1-5, you should see only one partition here, and you can skip to  8.
Note the partition # of the partition and

7. Select Partiton #
where # is the partition #


as can be seen from the image aboove, cause I did a clean command, I have only one partition and the partition is selected by default (the * beside the partition name), so the List partition and select partition is not needed; but for those who skipped to this stage as a result of having multiple partition on their harddrive, they will see multiple partitions and can select the one they wish to format and use as bootable.

8. format fs=fat32 quick

9. active


10. assign

11. Exit

12. double click on the ISO image; or open the iso image with windows explorer (Windows 8 & above) and copy its content directly into the flash, or extract the ISO image with any of your favourite extractors and paste it's content into the USB disk.


IF UEFI ENVIRONMENT

If you're installing in a UEFI environment, If it's the new Windows 10, you are done already, if it is a windows 8 ISO image, continue with the additional steps below.

13. if you're installing from a 64 bit environment, goto EFI/Boot directory, if there is a bootx64.efi file in there, you need not worry anymore, you're done else;

14. locate and open install.wim in sources folder

15. copy bootx64.efi to the efi/boot directory of the USB removable disk

16. rename bootx64.efi to bootx64.efi.

17. Grab a drink, you're done.

IF NON UEFI / LEGACY ENVIRONMENT

For those who want to install in a non UEFI environment but the legacy/preUEFI days mode. follow the steps instead;

13.  Goto start, type CMD or Command Prompt, rick click and run as administrator or ctrl + shift + left click / Enter.

14.  type x: where x is the drive letter of the mounted ISO or of your USB removable disk. e.g d:

15. type cd boot to navigate into the x:\boot\ directory

16: type bootsect /nt60 d:
Where d: is the drive letter of your USB removable disk drive.

How to increase COPY/PASTE Speed in Windows?

The copy speed increase can increased by following steps

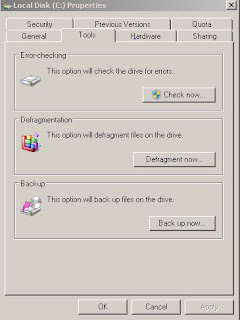
  • Go to My Computer.
  • Then go to Local Disk (C:) or the drive where OS is installed.
  • Right click on it and go to properties.   


  •  Then click on Hardware.
  •   Then go to Disk Drives.

                                          
  • Then click on properties.
  • Then click on policies.
  • AND see that whether "Enable writing cache is enabled" if not enable it.
                                         
      
Press "OK" and close window.

Unable to set DEFAULT PRINTER?

Unable to Set Default Printer pop-up error window:


This error is related to the old printer you have set as default before. Printers name that was recorded in your registry are priority on the system which you cannot modify if you're trying to set a new default printer. So you have to manually modify the registry. Note that the registry section is very sensitive,  serious  problems might occur if you modify the registry incorrectly.  Therefore, make sure that you follow these steps carefully.  For insurance included, move down the registry before you alter it. And that point, you can restore the registry if an issue happens. For Additional data about how to go down and restore the registry, click the accompanying article number to view the article in the Microsoft Knowledge Base:
How to back up and restore the registry in Windows: (http://support.microsoft.com/kb/322756/)

Now, here's how to troubleshoot:

1. Click the Start button and type "regedit", then right click and "run as administrator"


2. Now go to this location:

HKEY_CURRENT_USER\Software\Microsoft\Windows NT\CurrentVersion\Window


3. Located in the right column, you can change the device key v alue data to your printer name. Right click on the Device key then modify the data value (e.g. "HP Laserjet P1006,winspool,Ne03:")


Note: You MIGHT encounter this "Error Editing Value" which you are unable to modify the data,


All you have to do is to set "permissions" to the key, and this is how its done:

Right Click on the "Windows" key and choose "Permissions", check "Allow" -> Apply, then OK.