Tuesday, 25 December 2018

Windows 7: Error copying large file - Not enough space to copy file.

Solution for the Error "There is not enough space on the disk" while copying very large file. Usually greater than or 8 GB. This problem is caused by FAT file format. The solution to this error is to convert the file format to NTFS. May be in future MS should consider changing the error to "File size too big FAT32 file system". It would make more sense instead of False 'Out Of Disk Space' Error When Copying Large.
To solve this problem (Not enough space to copy file), convert the drive to NTFS with NoSecurity setting. Do the following:
  1. Click the Start button
  2. Click All Programs
  3. Click Accessories
  4. Right click Command Prompt
  5. Click Run as Administrator
  6. Enter the command, convert /fs:ntfs /nosecurity (drive should be the drive letter of your external hard drive, for example convert F: /fs:ntfs /nosecurity )
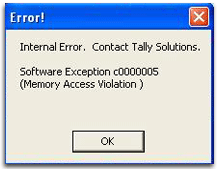
Tally Memory Access Violation - (Software Exception 0xC0000005)


If you have been working with Tally for sometime, you might have come accross 'Memory Access Violation' error with some code - '0xC0000005'. This usually spells doom to many users. Luckly, there are somethings you can do to attempt to solve the problem.

Step 1: Edit the Tally.ini Configuration File

There is a setting that tells Tally to automatically load a company. Supposing the company file is corrupted, you might never start Tally. So disable it. The 'Tally.ini' file is in Tally directory.


  • Set "default companies from 'yes' to 'no' Save the file, close and start Tally. If Tally starts without issues, then your default company file is corrupted and you will need to carry out repair outlined later in this article.

    Step 2: Adjust Screen Resolution

    Tally has issues when being used with fewer colours. Additionaly, different versions of windows have different minimum requirements. Access Display Settings in the control panel and change Display Settings as follows:
     
  •  Windows 2K/XP/Vista/Win7:
  • Screen Resolution : 1024 by 768 pixels
  • Color Quality : Highest (32 bit)

    Windows 98:
  • Screen Resolution : 1024 by 768 pixels
  • Color Quality : 16 bit High Color For Windows 98, ensure that Font Size is set to 'Small Fonts' otherwise Tally may goof. Once this has been done, restart you computer and start Tally. If you still have problems, try the next step.

    Step 3: Remove/Delete Printers

    Yes, sometimes Tally has a thing with printers! Make sure you have printer installation CDs nearby. Delete the configured printers (including vitual printers). Go to Start > Control Panel > Printers & Faxes. Try to fire tally. If it works, re-install only printers that you use and you should be fine.

    Step 4: Contact Tally Support

    At this point, you probably have a more complex problem - this should not make you give up. Contact Tally solutions for more help.

    How to Repair Damaged Company File

    Restore older backup

    In 'Step 1' above, you might have established the problem to be a corrupt company file.
    1. Change to directory to the location where data is stored, usually 'Data' in the tally folder.
    2. Company files are named using numbers - eg: 1001, 2002 e.t.c. Copy the corrupt company folder to a safe place.
    3. Delete contents of the corrupt compnay folder.
    4. Start Tally and restore your latest backup.
    Now, start Tally and you should be fine!

    If you encounter 'Memory Access' error while editing a record

    Sometime everything works well so long as you are not deleting or modifying a record. I noticed that, for some unknown reasons this problem arises when I try to delete a certain record. I have tried to re-produce this scenario without success. Here is what you can do if you have this kind of problem:
    1. Carry out instructions outlined in 'How to Repair Damaged Company File' above.
    2. Start Tally and press 'CTRL+ALT+R'
    3. You will be asked to rewrite the company file. Select the problematic company and accept to re-write.
    4. Once the process is complete, exit tally. 
    5. Start Tally and edit your records without. If you still have difficulties, then contact Tally Solutions.
  • Tally Error Code 2147483650

  • Take your time to backup your data. It is the best you have now.
  • Create a folder and rename with 5 digit number (Like 13332)
  • Copy these files from corrupted data folder to the newly created 13332 folder:
    - Company.900
    - Linkmgr.900
    - Manager.900
    - Tranmgr.900
    - Cmpsave.900
  • launch cmd.exe and run this command on the black/white screen: C:\Tally.ERP9\tally.exe data 0
  • On your keyboard, hold down Ctrl+Alt+R and click on YES to confirm operation.
  • Sit back, relax and keep your fingers crossed
  • Once process is complete, close tally and try again. Problem should be sorted.

  • How to enable or disable network adapters using PowerShell

    you can even use the PowerShell command line shell to disable or enable any network adapters that you don't use on your PC.

    Disabling adapter

    To disable a Wi-Fi or Ethernet network adapter on Windows 10 using PowerShell, use these steps:
    1. Open Start.
    2. Search for Windows PowerShell, right-click the top result, and select Run as administrator.
    3. Type the following command to identify the name of the adapter you want to disable and press Enter:
      Get-NetAdapter | format-table
    4. Type the following command to disable the Wi-Fi or Ethernet adapter and press Enter:
      Disable-NetAdapter -Name "YOUR-ADAPTER-NAME" -Confirm:$false


      In the command remember to specify the name of the adapter you want to disable. The quotation marks are only required if there are spaces within the name.

    Enabling adapter

    To enable a network adapter on Windows 10 using PowerShell, use these steps:
    1. Open Start.
    2. Search for Windows PowerShell, right-click the top result, and select Run as administrator.
    3. Type the following command to identify the name of the adapter you want to enable and press Enter:
      Get-NetAdapter | format-table
    4. Type the following command to disable the Wi-Fi or Ethernet adapter and press Enter:
      Enable-NetAdapter -Name "YOUR-ADAPTER-NAME" -Confirm:$false


      In the command remember to specify the name of the adapter you want to enable. The quotation marks are only required if there are spaces within the name.

    How to enable or disable network adapters using Command Prompt

    On Windows 10, you can use the netsh command tool to disable or re-enable network adapters on your device.

    Disabling adapter

    To disable a network adapter using netsh in Command Prompt, use these steps:
    1. Open Start.
    2. Search for Command Prompt, right-click the top result, and select Run as administrator.
    3. Type the following command to identify the name of the adapter you want to disable and press Enter:
      netsh interface show interface
    4. Type the following command to disable the Wi-Fi or Ethernet adapter and press Enter:
      netsh interface set interface "YOUR-ADAPTER-NAME" disable


      In the command remember to specify the name of the adapter you want to disable. The quotation marks are only required if there are spaces within the name.

    Enabling adapter

    To enable a network adapter using netsh in Command Prompt, use these steps:
    1. Open Start.
    2. Search for Command Prompt, right-click the top result, and select Run as administrator.
    3. Type the following command to identify the name of the adapter you want to enable and press Enter:
      netsh interface show interface
    4. Type the following command to disable the Wi-Fi or Ethernet adapter and press Enter:
      netsh interface set interface "YOUR-ADAPTER-NAME" enable


      In the command remember to specify the name of the adapter you want to enable. The quotation marks are only required if there are spaces within the name.