Solution for
Step - 1 /server pc Press the Windows key and type Control Panel into the search bar. now open the new interface and scroll down the Printer and Document Service into the search bar, Control Panel\ Programs and Features\ Turn Windows Features On or Off\Printer and Document Service\1.LPD Printer Service 2.LPR Port Monitor 3.internet printing client Step -2 / server pc Press the Windows key and type Registry Editor into the search bar.click on registry editor just search for user everyone and if you don't find it here then click on add and after click on ok press. Registry Editor\HKEY_CURRENT_USER\Software\Microsoft\WindowsNT\CurrentVersion\Windows Then Right-click on Windows key and select Permissions. Step - 3/server Registry Editor\HKEY_LOCAL_MACHINE\Software\Policies\Microsoft\Windows NT\Printers\RPC There are 2 values that can be configured: RpcOverTcp Value - 0 RpcOverNamedPipes Value - 1 Step - 4/server Registry Editor\HKEY_LOCAL_MACHINE\SYSTEM\CurrentControlSet\Control\Print RpcAuthnLevelPrivacyEnabled step 5/ server Update Your Printer’s Driver 1. Open the Start menu by pressing the Windows key and type Device Manager. 2. Click Open and select Print queues to check all the connected Printers. 3. Right-click on your printer name from the list. 4. From the context menu that follows, click Update driver. 5.If you've downloaded the latest driver file, select Browser my computer for drivers. Then, you've to choose the driver file from Windows Explorer to update the driver. 6.If you don't have the driver file, click Search automatically for drivers to update your printer's driver. 7. Once done, restart your PC. Method 6 /server Disable Firewall 1: Press the Win + R keys together on your keyboard to open the Run command window. 2: In the Run command search field, type firewall.cpl and hit Enter to open the Windows Defender Firewall window in Control Panel. 3: In the Control Panel window, click on Turn Windows Defender Firewall on or off on the left side of the pane. 4: In the Customise Settings window, under the Customise settings for each type of network, go to Private network settings and select the Turn off Windows Defender Firewall (not recommended) option. Repeat this for the Public network settings also. Press OK to save the changes and exit. step-7/client pc Manualy Softwear installed. Step 8 /client pc Add a local printer through Network. 1. press the Windows key and type In the Control Panel and click on Control Panel into the search bar. 2. Now select Devices and Printers\Add device \ Printer and Scanners \ Add device\ If not a single device is shown here, click “The printer that I want isn’t listed“. Click on the Add Manually. 3. Select share a Printer by Name. Afterward, mark the radio button left to “Add a local printer or network printer manual settings” followed by the Next button. 4. Next, enter the Network Path to the Printer (ie. \\ComputerName\SharedPrinterName) as the Port Name. 5. next click. 6. select whether you want to make this a default printer or notFriday, 17 October 2025

Thursday, 3 April 2025
How to Fix "An extended error has occurred" in Windows 11
1) open Powershall with Run as Administrator
2) PowerShell command: Set-SmbClientConfiguration -RequireSecuritySignature $false
3) Yes - y Type
4) ok And Powershall Menu CLOSE
Thursday, 7 March 2024
You can’t access this shared folder because your organization’s security policies block unauthenticated guest access

- Open Local Group Policy Editor
- Go to Lanman workstation
- Change the setting of Enable insecure guest logons from Not Configured to Enabled
- Save changes and try again.
You will need admin permission for some of these.
1] Using Group Policy
Editor
Open the Local Group Policy Editor. You can
press Win+R, type gpedit.msc, and hit the Enter button.
Alternatively, you can search for the same in the Taskbar search box.
After opening the
Local Group Policy Editor, navigate to this path-
Computer configuration
> Administrative Templates > Network > Lanman Workstation
On your right side, you should see a setting called Enable insecure guest logons. Double-click on it, and change the setting to Not Configured to Enabled and save your change.

Now, you should not get any problems.
2] Using Registry
Editor
There is one more way
to enable the functionality in Windows 10, and you can use the Registry Editor
to get the job done.
Before tweaking any
file, it is recommended to backup all Registry files.
Then, open the Registry Editor on your
computer. For that, press Win+R, type regedit, and
press Enter. You need to select Yes in the UAC window. After that, navigate to
this path-
Computer\HKEY_LOCAL_MACHINE\SOFTWARE\Policies\Microsoft\Windows
Here you need to create a key named LanmanWorkstation,
only if it does not exist already. To generate the key, right-click on the
Windows key and select New > Key. Following that, name it
as LanmanWorkstation.
Now, select this newly
created key and right-click on the right side > New > DWORD (32-bit)
Value and name it AllowInsecureGuestAuth.

Set the Value data of this REG_DWORD value as 1 and save your change.
Friday, 25 August 2023
How To Solved operation could not be completed error 0x709 Fix windows 11 & 10
Step - 1
Turn Windows Features On or Off
Printer and Document Service
LPD Printer Service
LPR Port Monitor
Step - 2
Local Group Policy Editor
Administrative Templetes
Printer
Configure RPC Connection - Enabled- RPC over named pipes
Configure RPC Listener - Enabled- RPC over named pipes and TCP
Configure RPC over TCP - Enabled
Step - 3
[HKEY_LOCAL_MACHINE\Software\Policies\Microsoft\Windows NT\Printers\RPC]
There are 2 values that can be configured:
RpcUseNamedPipeProtocol REG_DWORD
0: RpcOverTcp Value - 0
1: RpcOverNamedPipes Value - 1
Step - 4
[HKEY_LOCAL_MACHINE\SYSTEM|CurrentControlSet\Control\Print
RpcAuthnLevelPrivacyEnabled REG_DWORD
Step - 5
HKEY_CURRENT_USER\Software\Microsoft\WindowsNT\CurrentVersion\Windows
Then Right-click on Windows key and select Permissions.
Step - Final
Print Spooler
Note:- Error 0×00000709, Operation Could Not be Completed, Printer, Default printer, 0x00000709 printer, 0x709, 0x00000709, Share Printer Problem, error 0x00000709, Share Printer error 709, the operation could not be completed, error 709 printer network windows 10, error 709 default printer, error 709 printer network, error 709 printer sharing, error 709 adding printer, operation could not be completed error 0x709, share printer error 709,Double check the Printer Name, printer sharing error 709 windows 11,
Thursday, 17 August 2023
How to Fix Windows 10 Not Showing App Icons in the Taskbar
1. Restart Windows Explorer
First up, let's try restarting Windows Explorer. Before you follow these steps, be sure to save your work to prevent any loss of data. Then, close all opened windows and apps.
Once you're ready to restart Windows Explorer, here's how to do it via Task Manager:
- Right-click Start and select Task Manager. Or use the Ctrl + Shift + Esc keyboard shortcut.
- Open the Processes tab and right-click Windows Explorer.
- Click Restart.

2. Check the Taskbar Settings
If Windows 10 doesn’t display certain icons within the taskbar, you should check your taskbar's settings. Here is how you can do that:
- Click Start, then head to Settings > Personalization.
- From the left-hand menu, select Taskbar.
- Turn off the toggle below Automatically hide the taskbar in tablet mode.
- From the Notification section, click Select which icons appear on the taskbar.
- Turn on the toggle for the icons you want to appear on the taskbar.


How to Turn Off Windows File Encryption (EFS)
How to Turn off Windows File Encryption (EFS) Windows 11 Using the Command Prompt
If you don’t have much time on your hands and want to get this done immediately, you can do it by using Command Prompt as an administrator. Search for the Command Prompt in the search bar, and when it comes up in the search results, select open as administrator. When it opens, type the following command fsutil behavior set disableencryption 1
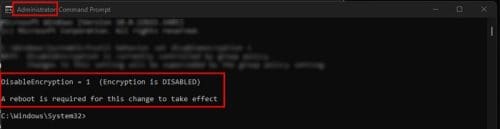
To turn it back on later, type the same command but make the one a zero. You should see a message on the Command Prompt letting you know that it was enabled or disabled and that you need to restart your computer for the changes to take effect.
How to Turn off Windows File Encryption (EFS) Windows 11 Using the Local Group Security Policy
Suppose you had trouble with the previous method. Or feel more comfortable using the Local Group Policy; you can disable it by pressing the Windows + R keys and entering secpol.msc and pressing enter. Once the Local Security Policy window opens, click on Security Settings at the top and click the dropdown menu for the Public Key Policies option. When you can see the additional options right-click on Encrypting File System and choose Properties. When the window opens, make sure you’re on the General tab and choose the Not Defined or Don’t Allow option. Once you’re done, you’ll need to restart your computer for the changes to take effect.
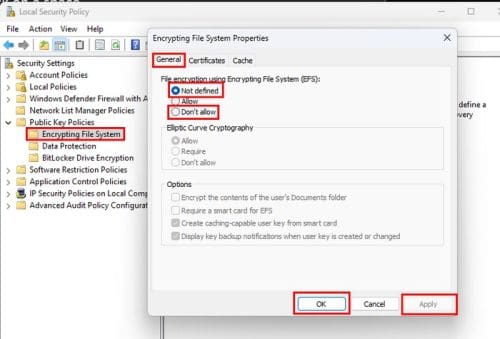
How to Turn off Windows File Encryption (EFS) Windows 11 Using the Local Group Policy Editor (Windows 11 Pro)
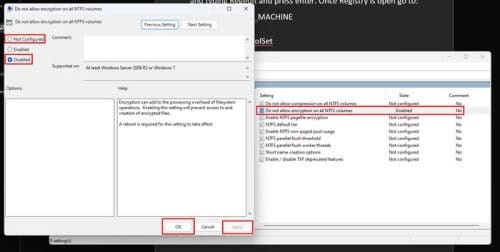
You can also use the Local Group Policy Editor to disable the Windows File Encryption. Open it by pressing the Windows + R keys and entering gpedit.msc and press enter. When the window opens, go to
- Computer Configuration
- Administrative Templates
- System
- Filesystem
- NTFS
Look for an option called Do not allow encryption on all NTFS volumes. Double-click on it, and when the other window opens, click on Not Configured or Disabled. Click on Apply and Ok to close the window. You’ll need to restart your computer to apply the changes.
How to Turn off Windows File Encryption (EFS) Windows 11 Using the Registry
Since you never know what might go wrong, it’s best always to have an up-to-date backup of your registry. If all is good to proceed, open the Registry by pressing the Windows + R keys, typing Regedit, and pressing enter. Once Registry is open, go to:
- HKEY_LOCAL_MACHINE
- SYSTEM
- CurrentControlSet
- Policies
- Right-click on a space
- Choose New
- Select DWORD (32-bit)
- Name it HtfsDisableEncryption
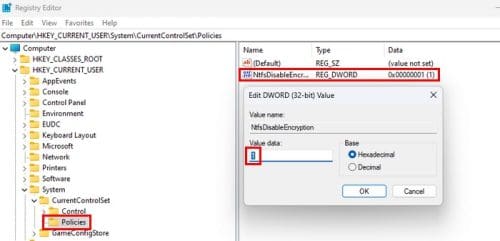
To turn it off, set the Value data to one. To enable it, you would need to change it to zero.
How to Turn off Windows File Encryption (EFS) Windows 11 Using Services
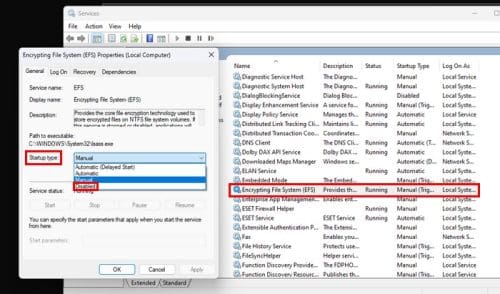
It’s also possible to disable Windows File Encryption by using Services. To open Services press the Windows +R keys and enter services.msc and press enter. Once it opens, scroll until you come across an option called Encryption File System; double-click on Startup type, and in the Startup type option, choose disabled from the listed options. Ensure that you press Apply, followed by Ok, to the changes can be saved.
Thursday, 27 July 2023
Fix: Windows Cannot Connect to the Shared Printer (0x00000002 – Printer Connectivity Error)
Error 0x00000002 can occur when trying to connect a shared network printer (from the Print Server or the local TCP/IP port) in both Windows 10 and Windows 7. After you have opened the list of shared printers on a remote computer (via UNC path \\computername), and clicked the Connect button, an error appears

The error 0x00000002 means that the driver of this printer installed on the computer is corrupted. First of all, you should try to remove this driver from the driver store (if you get an error 0x00000057).
Run this command:
printui.exe /s /t2
In the list of installed drivers, find the printer driver you want to reinstall and remove it by clicking Remove and select the Remove driver and driver package option.
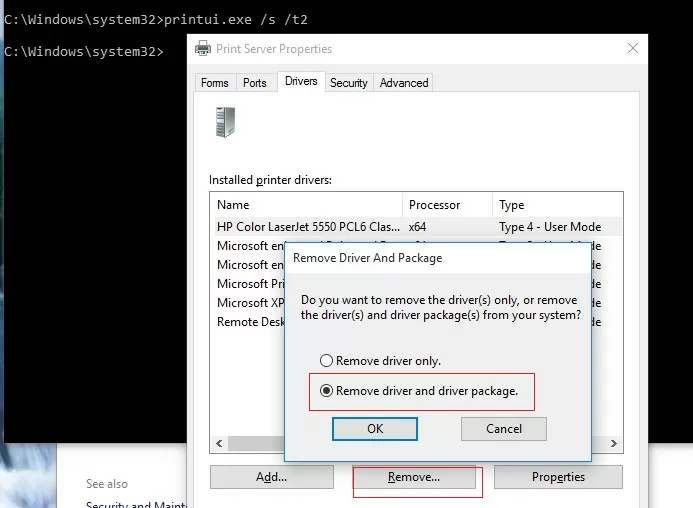
Restart the spooler (net stop spooler & net start spooler) and try to connect your printer again.
It is likely that the driver will be installed and the printer will connect successfully.
Otherwise, try the following:
- Remove this registry key: HKEY_LOCAL_MACHINE\SYSTEM\CurrentControlSet\Control\Session Manager\PendingFileRenameOperations;
- If there are any subfolders with the names from 1 to 499 in
c:\Windows\System32\spool\prtprocs\x64, delete all of them except winprint.dll; - Delete all Print Processors and drivers (except winprint) from the reg key HKLM\SYSTEM\CurrentControlSet\Control\Print\Environments;
- Restart your computer and connect to the shared printer.
As a workaround, if the previous methods haven’t helped, connect your printer via UNC path following the instructions in the article How to Print on Windows 10 Network Printer from XP.
Tuesday, 21 March 2023
Printers not visible in Microsoft Excel & Word..
here is the following step which is solve my problem you can also try this
Printer not show in excel 2007
Please do the following steps
Open regedit
Go to HKEY_CURRENT_USER -> software -> Microsoft -> WindowsNT ->
Here you find the three folder Devices , Printer Ports and Windows
Right click on every folder and give the full permission for the user in which you show this problem
Restart the system
And reinstall the printer
May be your problem is solved
Tuesday, 15 November 2022
Yellow triangle warning on C Drive on Windows 11/10
If you face a "Yellow Triangle Warning on C: drive" in Windows 10, then continue reading below to fix the issue. The "Yellow triangle with an exclamation mark on Drive C:" (or other drives), comes from BitLocker, because the BitLocker Encryption on the drive is not activated yet and shows "Waiting for activation". (in Control Panel -> BitLocker Drive Encryption).
The BitLocker warning, can appear after installing a Windows 10 update, or after completing the Out Of Box Experience (OOBE) on a new purchased laptop or desktop that support BitLocker.
- Related article: HP Business PCs – A Yellow Triangle Warning Appears on the C Drive in File Explorer.
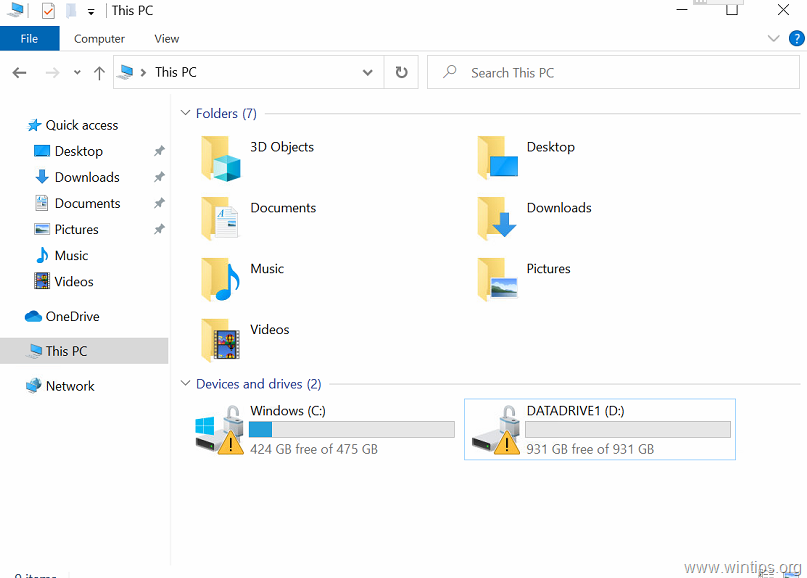
This tutorial contains instructions to remove the yellow triangle warning on Drive C: & the "BitLocker waiting for activation" message, on Windows 10.
How to Eliminate the BitLocker's Yellow Triangle Warning on Drive C: (Windows 10).
The yellow explanation on drive(s) in File Explorer, means that automatic device encryption is not enabled because it has been suspended for firmware upgrades or system updates. To resolve the problem, you can follow the instructions of one of the methods below according your case:
- Case A: If you want to use the BitLocker Encryption, follow the instructions at Method-1.
- Case B: If you don't want to use the BitLocker Encryption, follow the instructions at Method-2.
Method 1. Turn On (Resume) BitLocker Encryption on C: Drive.
If you 're using (or you want to use) the BitLocker encryption to protect your PC and your sensitive data, proceed and resume (enable) the BitLocker encryption on drive C:, by following the instructions below:
1. Navigate to Windows Control Panel (small icons view), and open BitLocker Drive Encryption.
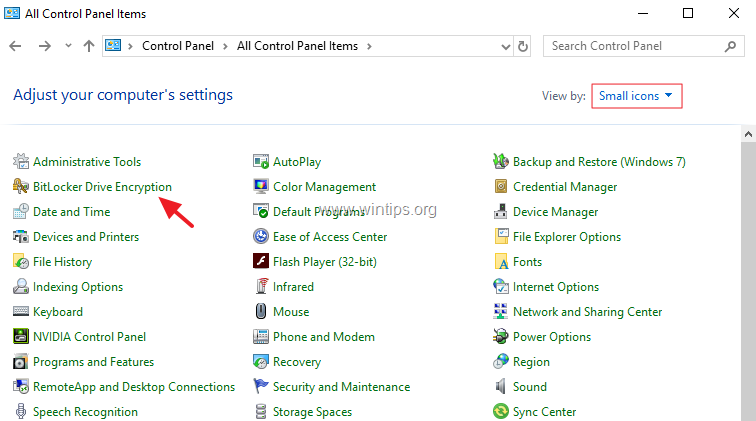
2. Click Turn BitLocker on, at every drive that has the indication "BitLocker waiting for activation".
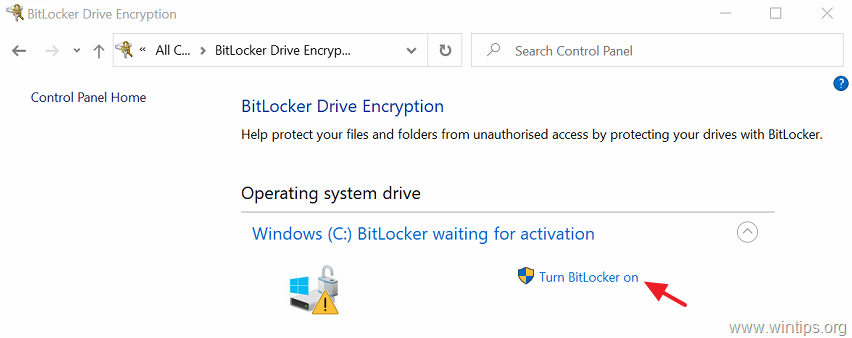
3. Follow the onscreen instructions, to enable BitLocker on the selected drive. *
* Note: The detailed instructions on how to enable BitLocker on your system, can be found here.
Method 2. Permanently Disable the BitLocker Protection on the Drive.
If you don't want to use the BitLocker protection, then proceed to turn off (deactivate) BitLocker and to decrypt the drive. To do that:
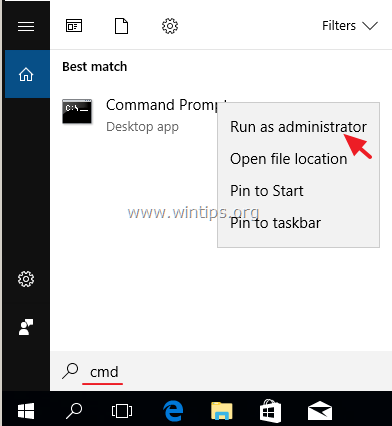
1. Open command prompt as administrator. To do that:
1. In the Search box type: cmd or command prompt
2. Right click on the command prompt (result) and select Run as Administrator.
- manage-bde C: -off
* Note: The above command will disable the BitLocker encryption on the drive C:. Replace the drive letter "C", if you want to decrypt any other drives. (e.g. to decrypt the drive D: the command will be: "manage-bde D: -off".)
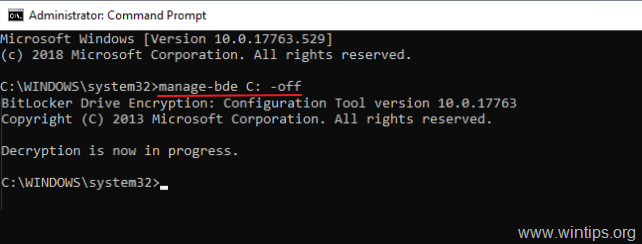
3. Close the command prompt window.
4. Navigate to Control Panel (small icons view), and open the BitLocker Drive Encryption.
5. Wait the BitLocker Decrypting process to complete. (it can take time to complete and this is normal.)

6. When the BitLocker is off, the "yellow triangle warning" on the drive in File Explorer will be removed.

Thursday, 28 July 2022
Language bar missing from taskbar Windows 7
Try the following:
- Open the Control Panel
- Go into the Regional and Language Options
- Open the Languages tab and click Details
- Go to Advanced, make sure the 2 boxes are unchecked (uncheck them if they are checked).
- Open the Settings tab and click on Language Bar
- Check the box: Show the Language bar on the desktop
- Confirm with OK.
- Open the Control Panel
- Go into the Regional and Language Options
- Open the Languages tab and click Details
- Go to Advanced, make sure the 2 boxes are unchecked (uncheck them if they are checked).
- Open the Settings tab and click on Language Bar
- Check the box: Show the Language bar on the desktop
- Confirm with OK.
2:-
The Language bar appears only if profiles are two or more keyboard installed
To install a different keyboard configuration, is in
"Control Panel"> "Regional and Language Options" then in the "Languages" tab, then click "Details"
You can click the "Add" and select a profile keyboard, any one, for example "French (Belgium)" or "French (Canada)" then click "Apply" and the Language bar will appear near your clock.
Otherwise, if you use a keyboard layout, the Language bar disappears, and only serves to change the keyboard layout.
To install a different keyboard configuration, is in
"Control Panel"> "Regional and Language Options" then in the "Languages" tab, then click "Details"
You can click the "Add" and select a profile keyboard, any one, for example "French (Belgium)" or "French (Canada)" then click "Apply" and the Language bar will appear near your clock.
Otherwise, if you use a keyboard layout, the Language bar disappears, and only serves to change the keyboard layout.
3:-
To show the Language bar (using Classic view in Control Panel):
1. Click Start, click Control Panel, and then double-click Regional and
Language Options.
2. On the Languages tab, under Text services and input languages, click
Details.
3. Under Preferences, click Language Bar.
4. Select the Show the Language bar on the desktop check box.
1. Click Start, click Control Panel, and then double-click Regional and
Language Options.
2. On the Languages tab, under Text services and input languages, click
Details.
3. Under Preferences, click Language Bar.
4. Select the Show the Language bar on the desktop check box.
4:-
goto control panel >language options >keyboard and language options>change keyboard>language bar(second tab)>select integrated into taskbar
This method will enable the startup service required for language bar, when your all settings are correct as mentioned above.
Go to Registry editor by typing ‘ regedit’ in Run dialog box. Go to the following location,
HKEY_LOCAL_MACHINE\SOFTWARE\Microsoft\Windows\CurrentVersion\Run
Right Click on blank space in right side, select New String Value.
Again right click on newly created value and press modify, then type as below.
“ctfmon”=”CTFMON.EXE”
Press OK, restart your computer. Now you can see the language bar in vista or Windows 7.
Friday, 8 April 2022
Set the time zone in Windows 10 in the Command Prompt
Set the time zone in Windows 10 in the Command Prompt
To configure the time zone in Windows 10 in the command prompt, you need to use the console tool tzutil. It comes with Windows 10 out-of-the-box. Here is how.
- Open an elevated command prompt.
- Type or copy-paste the following command to see the list of available time zones:
tzutil /l
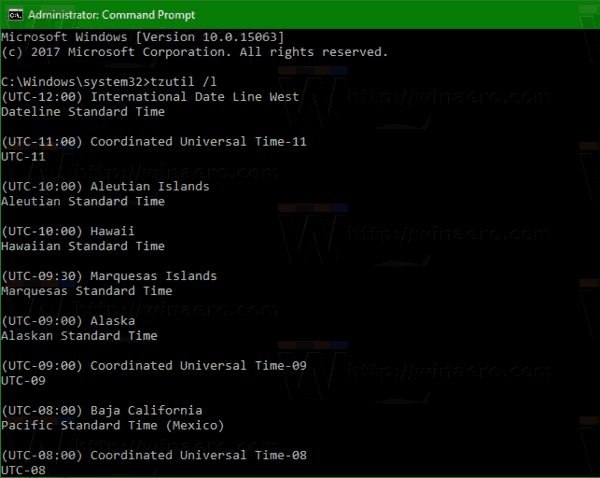
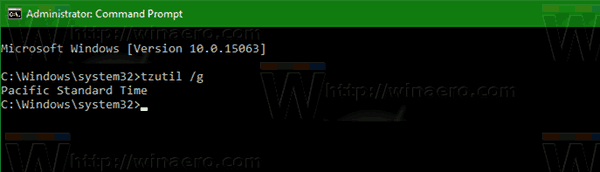
- To see the current time zone, type the command
tzutil /g
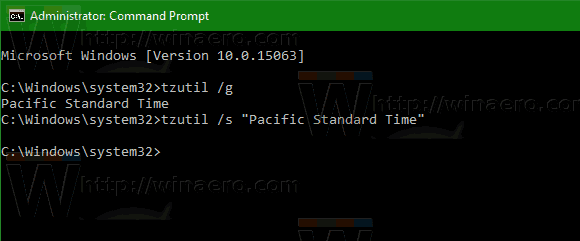
- To set a new time zone, execute the command
tzutil /s "Pacific Standard Time"
How to Fix Windows Printer Error 0x0000011b

How to Fix Windows Printer Error 0x0000011b
Uninstall Recent Windows Updates
If error code 0x0000011b started occurring after installing the latest Windows updates, uninstall them and see if this helps. Many Windows 11 users confirmed that uninstalling KBKB5005565 and KB5005568 fixed the problem.
- Launch Control Panel.
- Click on Uninstall a program.
- Then click on View installed updates.
- Select the latest updates and hit the Uninstall button.

After uninstalling the updates, check if your computer can connect to your printer. If error 0x0000011b persists, install your printer using its IP address.
By the way, you may want to temporarily disable auto-updates. When you restart your computer, Windows will automatically download and install the latest updates, triggering error 0x0000011b again.
Manually Add the Printer Using Its IP Address
- Go to Settings.
- Select Bluetooth and Devices.
- Scroll down to Printers and Scanners.
- Then click on the Add device button to add a printer or scanner.
- Click on the link that says the printer you want to add is not on the list.
- Go to Add a printer using a TCP/IP or hostname.

- Follow the on-screen instructions and manually insert the printer’s IP address.
- Hit Next to connect your computer to your printer.
- Print a test page to check if your printer works as intended.
Disable Print Spooler RPC Encryption
To fix error code 0x0000011b, Microsoft says you should disable the print spooler privacy settings on both the Client and Print Server. When the RpcAuthnLevelPrivacyEnabled Registry key is set to 1, Windows automatically encrypts RPC communication with network printers and print servers. Disable this option to get rid of error code 0x0000011b.
- Launch the Registry Editor.
- Navigate to
HKEY_LOCAL_MACHINE\System\CurrentControlSet\Control\Print. - Right-click on the Print key and select New→ DWORD-32 bit Value.
- Name the new key RpcAuthnLevelPrivacyEnabled.
- Double-click on the new key and set its value to 0 (zero).

- Restart your computer, and check if it connects to your printer.
Conclusion
To fix error code 0x0000011b when printing on Windows 11, uninstall all the recently installed updates, especially KBKB5005565 and KB5005568. Then, manually add the printer using its IP address. If the error persists, disable Print Spooler RPC encryption.
Subscribe to:
Posts (Atom)