Tuesday 15 November 2022

Yellow triangle warning on C Drive on Windows 11/10

 If you face a "Yellow Triangle Warning on C: drive" in Windows 10, then continue reading below to fix the issue. The "Yellow triangle with an exclamation mark on Drive C:" (or other drives), comes from BitLocker, because the BitLocker Encryption on the drive is not activated yet and shows "Waiting for activation". (in Control Panel -> BitLocker Drive Encryption).

The BitLocker warning, can appear after installing a Windows 10 update, or after completing the Out Of Box Experience (OOBE) on a new purchased laptop or desktop that support BitLocker.

Remove Yellow Triangle Warning on Drive C:


This tutorial contains instructions to remove the yellow triangle warning on Drive C: & the "BitLocker waiting for activation" message, on Windows 10.

How to Eliminate the BitLocker's Yellow Triangle Warning on Drive C: (Windows 10).

The yellow explanation on drive(s) in File Explorer, means that automatic device encryption is not enabled because it has been suspended for firmware upgrades or system updates. To resolve the problem, you can follow the instructions of one of the methods below according your case:

  • Case A: If you want to use the BitLocker Encryption, follow the instructions at Method-1.
  • Case B: If you don't want to use the BitLocker Encryption, follow the instructions at Method-2.


Method 1. Turn On (Resume) BitLocker Encryption on C: Drive.

If you 're using (or you want to use) the BitLocker encryption to protect your PC and your sensitive data, proceed and resume (enable) the BitLocker encryption on drive C:, by following the instructions below:

1. Navigate to Windows Control Panel (small icons view), and open BitLocker Drive Encryption.

bitlocker drive encryption windows 10


2. Click Turn BitLocker on, at every drive that has the indication "BitLocker waiting for activation".

fix BitLocker waiting for activation on Windows 10


3. Follow the onscreen instructions, to enable BitLocker on the selected drive. *

* Note: The detailed instructions on how to enable BitLocker on your system, can be found here.

Method 2. Permanently Disable the BitLocker Protection on the Drive.

If you don't want to use the BitLocker protection, then proceed to turn off (deactivate) BitLocker and to decrypt the drive. To do that:

1. Open command prompt as administrator. To do that:

1. In the Search box type: cmd or command prompt
2. Right click on the command prompt (result) and select Run as Administrator.

command prompt administrator


  • manage-bde C: -off

* Note: The above command will disable the BitLocker encryption on the drive C:. Replace the drive letter "C", if you want to decrypt any other drives. (e.g. to decrypt the drive D: the command will be: "manage-bde D: -off".)

Disable BitLocker on Drive - Windows 10


3. Close the command prompt window.
4. Navigate to Control Panel (small icons view), and open the BitLocker Drive Encryption.
5. Wait the BitLocker Decrypting process to complete. (it can take time to complete and this is normal.)

BitLocker Decrypting

 6. When the BitLocker is off, the "yellow triangle warning" on the drive in File Explorer will be removed.

View BitLocker Drive Encryption Status


Thursday 28 July 2022

Language bar missing from taskbar Windows 7

Try the following:
- Open the Control Panel
- Go into the Regional and Language Options
- Open the Languages tab and click Details
- Go to Advanced, make sure the 2 boxes are unchecked (uncheck them if they are checked).
- Open the Settings tab and click on Language Bar
- Check the box: Show the Language bar on the desktop
- Confirm with OK.


2:-
The Language bar appears only if profiles are two or more keyboard installed

To install a different keyboard configuration, is in

"Control Panel"> "Regional and Language Options" then in the "Languages" tab, then click "Details"

You can click the "Add" and select a profile keyboard, any one, for example "French (Belgium)" or "French (Canada)" then click "Apply" and the Language bar will appear near your clock.

Otherwise, if you use a keyboard layout, the Language bar disappears, and only serves to change the keyboard layout.
 
 
3:-
To show the Language bar (using Classic view in Control Panel):

1. Click Start, click Control Panel, and then double-click Regional and
Language Options.
2. On the Languages tab, under Text services and input languages, click
Details.
3. Under Preferences, click Language Bar.
4. Select the Show the Language bar on the desktop check box.
 
 
4:-

goto control panel >language options >keyboard and language options>change keyboard>language bar(second tab)>select integrated into taskbar


This method will enable the startup service required for language bar, when your all settings are correct as mentioned above.

Go to Registry editor by typing ‘ regedit’ in Run dialog box. Go to the following location,

HKEY_LOCAL_MACHINE\SOFTWARE\Microsoft\Windows\CurrentVersion\Run


Right Click on blank space in right side, select New String Value.


Again right click on newly created value and press modify, then type as below.

“ctfmon”=”CTFMON.EXE”

 Press OK, restart your computer. Now you can see the language bar in vista or Windows 7.

Friday 8 April 2022

Set the time zone in Windows 10 in the Command Prompt


Set the time zone in Windows 10 in the Command Prompt

To configure the time zone in Windows 10 in the command prompt, you need to use the console tool tzutil. It comes with Windows 10 out-of-the-box. Here is how.

  1. Open an elevated command prompt.
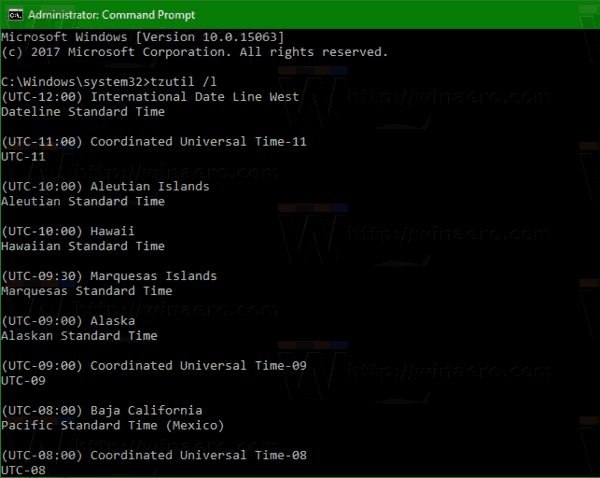
  2. Type or copy-paste the following command to see the list of available time zones:
    tzutil /l

    Windows 10 List Available Time Zones

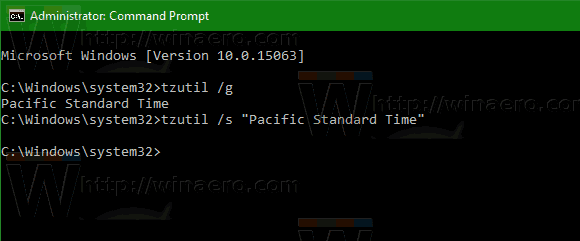
  3. To see the current time zone, type the command
    tzutil /g

    Windows 10 Cmd See Timezone

  4. To set a new time zone, execute the command
    tzutil /s "Pacific Standard Time"

    Windows 10 Cmd Set Timezone


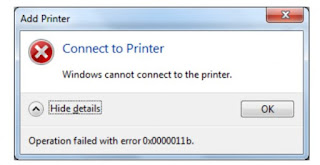
How to Fix Windows Printer Error 0x0000011b


How to Fix Windows Printer Error 0x0000011b

Uninstall Recent Windows Updates

If error code 0x0000011b started occurring after installing the latest Windows updates, uninstall them and see if this helps. Many Windows 11 users confirmed that uninstalling KBKB5005565 and KB5005568 fixed the problem.

  1. Launch Control Panel.
  2. Click on Uninstall a program.
  3. Then click on View installed updates.
  4. Select the latest updates and hit the Uninstall button.


After uninstalling the updates, check if your computer can connect to your printer. If error 0x0000011b persists, install your printer using its IP address.

By the way, you may want to temporarily disable auto-updates. When you restart your computer, Windows will automatically download and install the latest updates, triggering error 0x0000011b again.

Manually Add the Printer Using Its IP Address

  1. Go to Settings.
  2. Select Bluetooth and Devices.
  3. Scroll down to Printers and Scanners.
  4. Then click on the Add device button to add a printer or scanner.
  5. Click on the link that says the printer you want to add is not on the list.
  6. Go to Add a printer using a TCP/IP or hostname.


  1. Follow the on-screen instructions and manually insert the printer’s IP address.
  2. Hit Next to connect your computer to your printer.
  3. Print a test page to check if your printer works as intended.

 Disable Print Spooler RPC Encryption

To fix error code 0x0000011b, Microsoft says you should disable the print spooler privacy settings on both the Client and Print Server. When the RpcAuthnLevelPrivacyEnabled Registry key is set to 1, Windows automatically encrypts RPC communication with network printers and print servers. Disable this option to get rid of error code 0x0000011b.


  1. Launch the Registry Editor.
  2. Navigate to HKEY_LOCAL_MACHINE\System\CurrentControlSet\Control\Print.
  3. Right-click on the Print key and select New→  DWORD-32 bit Value.
  4. Name the new key RpcAuthnLevelPrivacyEnabled.
  5. Double-click on the new key and set its value to 0 (zero).


  1. Restart your computer, and check if it connects to your printer.

Conclusion

To fix error code 0x0000011b when printing on Windows 11, uninstall all the recently installed updates, especially KBKB5005565 and KB5005568. Then, manually add the printer using its IP address. If the error persists, disable Print Spooler RPC encryption.


Thursday 17 March 2022

How to Reset Canon G Series printers - G1010, G2010, G3000, G3010 and G4010

 How to Reset Canon G Series printers - G1010, G2010, G3000, G3010 and G4010. Canon G Series printer is a type of printer that was released in 2018 by issuing five types of G series printers, namely the G1010, G2010, G3000, G3010 and G4010 types. Different from other canon inkjets, this G series printer is equipped with an Ink Tank System, which means you can refill the ink without having to replace the cartridge.


HOW TO RESET CANON G SERIES PRINTERS.

Here are the steps or steps taken for the Canon G Series reset process
  • First, turn off the printer
  • Insert paper into the printer tray to check the printer ink quality
  • Then press and hold the resume / stop button (red triangle) together with press the power button (ON / OFF)
  • Then release the resume / stop button (red triangle), but still press the power button
  • Then press the resume / stop button 5 times
  • And release all the buttons.
  • Then the green indicator light will automatically flash and wait until the green indicator light stays on without blinking.
  • When the indicator light turns on normally, press the resume / stop button again 5 times followed by pressing the power button 1 time.
  • After the print results come out, the indicator light will turn green, and press the Stop button again for 3 times by pressing the power button 1 time.
  • If the printed paper comes out with a half page print, then the reset process has been successfully carried out.
  • The final step, turn off the printer and turn it on again, then the printer is ready to be used again.
That is the information given about How to Reset Canon G Series Printer. Hopefully the information provided is useful and can increase your knowledge about the world of information and technology.


Thursday 10 March 2022

Turn off your PC by voice from anywhere.

How to turn off your computer with voice from everywhere


Youtube Video: -https://www.youtube.com/watch?v=gEj3dBV2Yn8


 Push2Run https://www.push2run.com/

PushBullet https://www.pushbullet.com/

IFFF https://ifttt.com/home

Push2Run Fix for password prompt on initial setup

 https://push2run.com/passwordpromptfix.html

 How to lock PC with voice from anywhere https://youtu.be/JyS7B5VukdM