Friday 25 August 2023
How To Solved operation could not be completed error 0x709 Fix windows 11 & 10
Thursday 17 August 2023
How to Fix Windows 10 Not Showing App Icons in the Taskbar
1. Restart Windows Explorer
First up, let's try restarting Windows Explorer. Before you follow these steps, be sure to save your work to prevent any loss of data. Then, close all opened windows and apps.
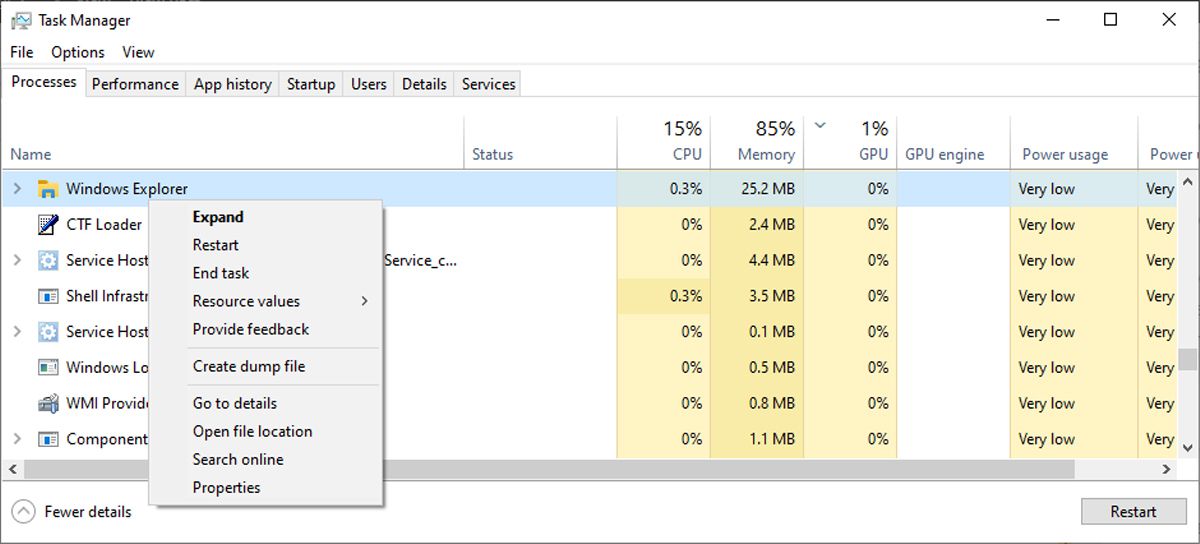
Once you're ready to restart Windows Explorer, here's how to do it via Task Manager:
- Right-click Start and select Task Manager. Or use the Ctrl + Shift + Esc keyboard shortcut.
- Open the Processes tab and right-click Windows Explorer.
- Click Restart.
2. Check the Taskbar Settings
If Windows 10 doesn’t display certain icons within the taskbar, you should check your taskbar's settings. Here is how you can do that:
- Click Start, then head to Settings > Personalization.
- From the left-hand menu, select Taskbar.
- Turn off the toggle below Automatically hide the taskbar in tablet mode.
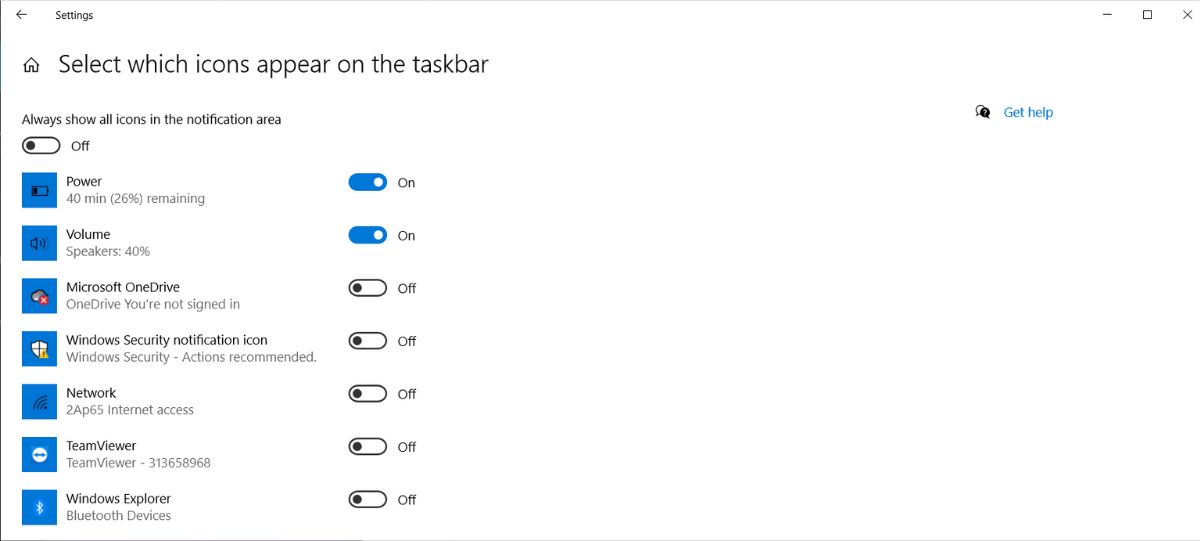
- From the Notification section, click Select which icons appear on the taskbar.
- Turn on the toggle for the icons you want to appear on the taskbar.
3. Delete the Icon Cache
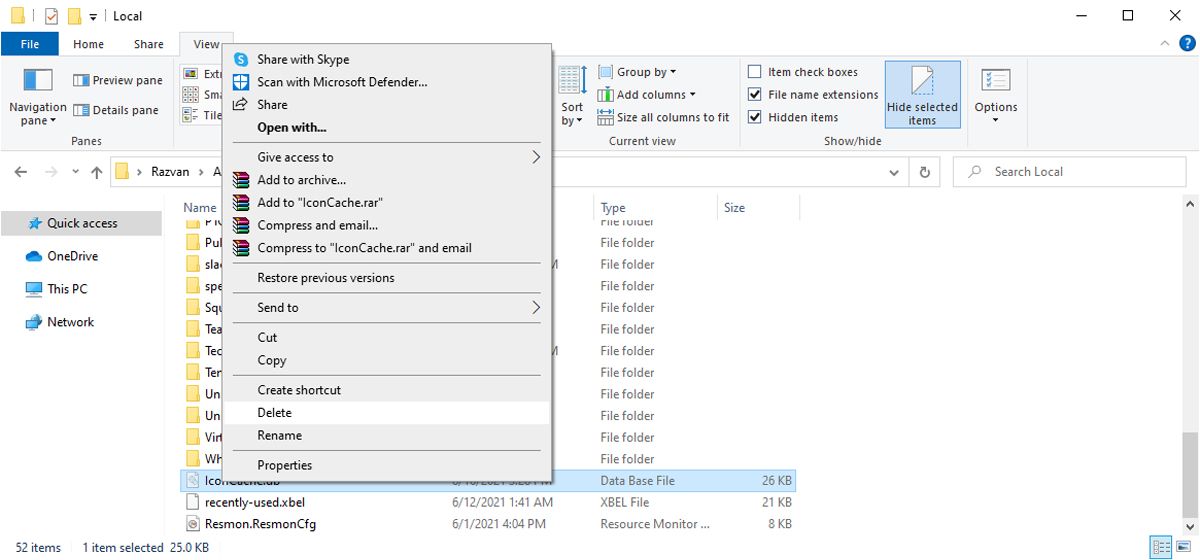
A corrupted App Icon Cache might be the reason why your app icons are missing from the taskbar. Follow these steps to delete the Icon Cache via File Explorer:
- Press Win + R to bring up a Run dialog.
- Type appdata, then click OK.
- Select the View tab and check the Hidden items options to make sure all files are visible.
- Locate and delete IconCache.db.
- Restart your computer and check if the taskbar is now displaying the icons.
How to Turn Off Windows File Encryption (EFS)
How to Turn off Windows File Encryption (EFS) Windows 11 Using the Command Prompt
If you don’t have much time on your hands and want to get this done immediately, you can do it by using Command Prompt as an administrator. Search for the Command Prompt in the search bar, and when it comes up in the search results, select open as administrator. When it opens, type the following command fsutil behavior set disableencryption 1

To turn it back on later, type the same command but make the one a zero. You should see a message on the Command Prompt letting you know that it was enabled or disabled and that you need to restart your computer for the changes to take effect.
How to Turn off Windows File Encryption (EFS) Windows 11 Using the Local Group Security Policy
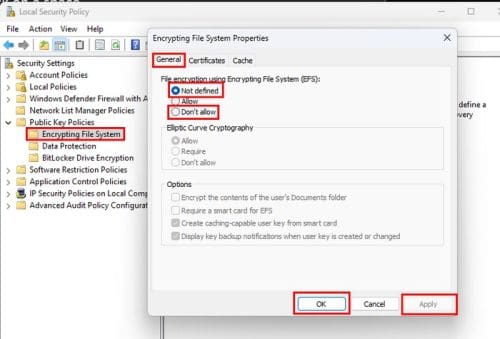
Suppose you had trouble with the previous method. Or feel more comfortable using the Local Group Policy; you can disable it by pressing the Windows + R keys and entering secpol.msc and pressing enter. Once the Local Security Policy window opens, click on Security Settings at the top and click the dropdown menu for the Public Key Policies option. When you can see the additional options right-click on Encrypting File System and choose Properties. When the window opens, make sure you’re on the General tab and choose the Not Defined or Don’t Allow option. Once you’re done, you’ll need to restart your computer for the changes to take effect.
How to Turn off Windows File Encryption (EFS) Windows 11 Using the Local Group Policy Editor (Windows 11 Pro)
You can also use the Local Group Policy Editor to disable the Windows File Encryption. Open it by pressing the Windows + R keys and entering gpedit.msc and press enter. When the window opens, go to
- Computer Configuration
- Administrative Templates
- System
- Filesystem
- NTFS
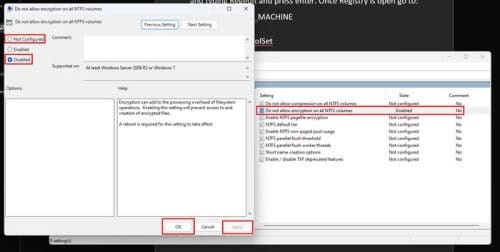
Look for an option called Do not allow encryption on all NTFS volumes. Double-click on it, and when the other window opens, click on Not Configured or Disabled. Click on Apply and Ok to close the window. You’ll need to restart your computer to apply the changes.
How to Turn off Windows File Encryption (EFS) Windows 11 Using the Registry
Since you never know what might go wrong, it’s best always to have an up-to-date backup of your registry. If all is good to proceed, open the Registry by pressing the Windows + R keys, typing Regedit, and pressing enter. Once Registry is open, go to:
- HKEY_LOCAL_MACHINE
- SYSTEM
- CurrentControlSet
- Policies
- Right-click on a space
- Choose New
- Select DWORD (32-bit)
- Name it HtfsDisableEncryption
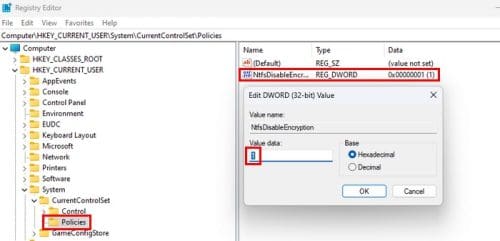
To turn it off, set the Value data to one. To enable it, you would need to change it to zero.
How to Turn off Windows File Encryption (EFS) Windows 11 Using Services
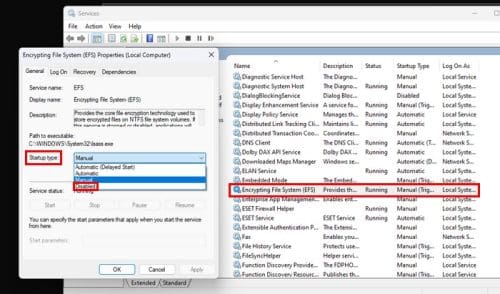
It’s also possible to disable Windows File Encryption by using Services. To open Services press the Windows +R keys and enter services.msc and press enter. Once it opens, scroll until you come across an option called Encryption File System; double-click on Startup type, and in the Startup type option, choose disabled from the listed options. Ensure that you press Apply, followed by Ok, to the changes can be saved.
