Friday, 8 April 2022

How to Fix Windows Printer Error 0x0000011b


How to Fix Windows Printer Error 0x0000011b

Uninstall Recent Windows Updates

If error code 0x0000011b started occurring after installing the latest Windows updates, uninstall them and see if this helps. Many Windows 11 users confirmed that uninstalling KBKB5005565 and KB5005568 fixed the problem.

  1. Launch Control Panel.
  2. Click on Uninstall a program.
  3. Then click on View installed updates.
  4. Select the latest updates and hit the Uninstall button.


After uninstalling the updates, check if your computer can connect to your printer. If error 0x0000011b persists, install your printer using its IP address.

By the way, you may want to temporarily disable auto-updates. When you restart your computer, Windows will automatically download and install the latest updates, triggering error 0x0000011b again.

Manually Add the Printer Using Its IP Address

  1. Go to Settings.
  2. Select Bluetooth and Devices.
  3. Scroll down to Printers and Scanners.
  4. Then click on the Add device button to add a printer or scanner.
  5. Click on the link that says the printer you want to add is not on the list.
  6. Go to Add a printer using a TCP/IP or hostname.


  1. Follow the on-screen instructions and manually insert the printer’s IP address.
  2. Hit Next to connect your computer to your printer.
  3. Print a test page to check if your printer works as intended.

 Disable Print Spooler RPC Encryption

To fix error code 0x0000011b, Microsoft says you should disable the print spooler privacy settings on both the Client and Print Server. When the RpcAuthnLevelPrivacyEnabled Registry key is set to 1, Windows automatically encrypts RPC communication with network printers and print servers. Disable this option to get rid of error code 0x0000011b.


  1. Launch the Registry Editor.
  2. Navigate to HKEY_LOCAL_MACHINE\System\CurrentControlSet\Control\Print.
  3. Right-click on the Print key and select New→  DWORD-32 bit Value.
  4. Name the new key RpcAuthnLevelPrivacyEnabled.
  5. Double-click on the new key and set its value to 0 (zero).


  1. Restart your computer, and check if it connects to your printer.

Conclusion

To fix error code 0x0000011b when printing on Windows 11, uninstall all the recently installed updates, especially KBKB5005565 and KB5005568. Then, manually add the printer using its IP address. If the error persists, disable Print Spooler RPC encryption.


Thursday, 17 March 2022

How to Reset Canon G Series printers - G1010, G2010, G3000, G3010 and G4010

 How to Reset Canon G Series printers - G1010, G2010, G3000, G3010 and G4010. Canon G Series printer is a type of printer that was released in 2018 by issuing five types of G series printers, namely the G1010, G2010, G3000, G3010 and G4010 types. Different from other canon inkjets, this G series printer is equipped with an Ink Tank System, which means you can refill the ink without having to replace the cartridge.


HOW TO RESET CANON G SERIES PRINTERS.

Here are the steps or steps taken for the Canon G Series reset process
  • First, turn off the printer
  • Insert paper into the printer tray to check the printer ink quality
  • Then press and hold the resume / stop button (red triangle) together with press the power button (ON / OFF)
  • Then release the resume / stop button (red triangle), but still press the power button
  • Then press the resume / stop button 5 times
  • And release all the buttons.
  • Then the green indicator light will automatically flash and wait until the green indicator light stays on without blinking.
  • When the indicator light turns on normally, press the resume / stop button again 5 times followed by pressing the power button 1 time.
  • After the print results come out, the indicator light will turn green, and press the Stop button again for 3 times by pressing the power button 1 time.
  • If the printed paper comes out with a half page print, then the reset process has been successfully carried out.
  • The final step, turn off the printer and turn it on again, then the printer is ready to be used again.
That is the information given about How to Reset Canon G Series Printer. Hopefully the information provided is useful and can increase your knowledge about the world of information and technology.


Thursday, 10 March 2022

Turn off your PC by voice from anywhere.

How to turn off your computer with voice from everywhere


Youtube Video: -https://www.youtube.com/watch?v=gEj3dBV2Yn8


 Push2Run https://www.push2run.com/

PushBullet https://www.pushbullet.com/

IFFF https://ifttt.com/home

Push2Run Fix for password prompt on initial setup

 https://push2run.com/passwordpromptfix.html

 How to lock PC with voice from anywhere https://youtu.be/JyS7B5VukdM


Saturday, 27 March 2021

How to Make Windows Photo Viewer Your Default Image Viewer on Windows 10

Step One: Enable Photo Viewer in the Registry

We’ll need to add the same registry entries that were present on Windows 7 and 8.1, and are still present on systems that upgraded from those old versions of Windows. To make things easy, we’ve put together a Registry hack you can use to make these edits quickly because they’re a little cumbersome to make manually. Download and unzip the following file:

Activate-Windows-Photo-Viewer-on-Windows-10

Inside, you’ll find two hacks. Run the “Activate Windows Photo Viewer on Windows 10” hack to create the keys and values in the Registry and activate Photo Viewer. And if you ever want to deactivate it, just run the “Deactivate Windows Photo Viewer on Windows 10 (Default)” hack. Of course, there’s no real need to deactivate it in the Registry. You can always leave it available and just associate your image files with a different app.

Note: A big thanks to nexus over at TenForums for locating the required registry settings.

And remember—this step is only necessary if you’re using a fresh Windows 10 system. If you upgraded from Windows 7 or 8.1, you should be able to go ahead and set Windows Photo Viewer as your default image-viewing application in all the usual ways.

Step Two: Set Windows Photo Viewer as Your Default Image Viewer

To associate an image file with Photo Viewer, right-click any type of image file—for example, a .png, .jpg, .gif, or .bmp file—and select Open With > Choose Another App.

In the “How do you want to open this file?” window, select Windows Photo Viewer. If you don’t see it at first, scroll to the bottom of what’s listed and click the “More apps” option—it’ll show up. Select the “Always use this app to open .___ files” option, and then click “OK.”

Update: If the “Choose Another App” option doesn’t work for some reason, here’s another way you can do it: First, right-click the type of image file you want to change (for example, a PNG, JPEG, GIF, or BMP file) and select “Properties” to open the Properties window. On the General pane, click the “Change” button to the right of “Opens With” and select Windows Photo Viewer.

Windows Photo Viewer will now be the default image viewer for that type of image file. You’ll need to repeat this process for each type of image file you want to use it with. In other words, whenever you open an image that opens in the Photos app, just close the Photos app and use the “Open with” menu to associate that file type with Windows Photo Viewer. You’ll only have to do this the first time you open each new type of image file.


Monday, 16 December 2019

Windows RDP “No Remote Desktop License Servers available” Error message fix

On a Server 2008 and 2012 RDS service that has been deployed and working for some time you begin to receive errors "The remote session was disconnected because there are no Remote Desktop License Server available" as shown below:


If this is happening after the license grace period AND you already had a setup a license server, please try the below steps:.

1. Login to the server and open Registry by typing regedit.exe in Run or cmd prompt.(please note that this should be opened as Administrator.

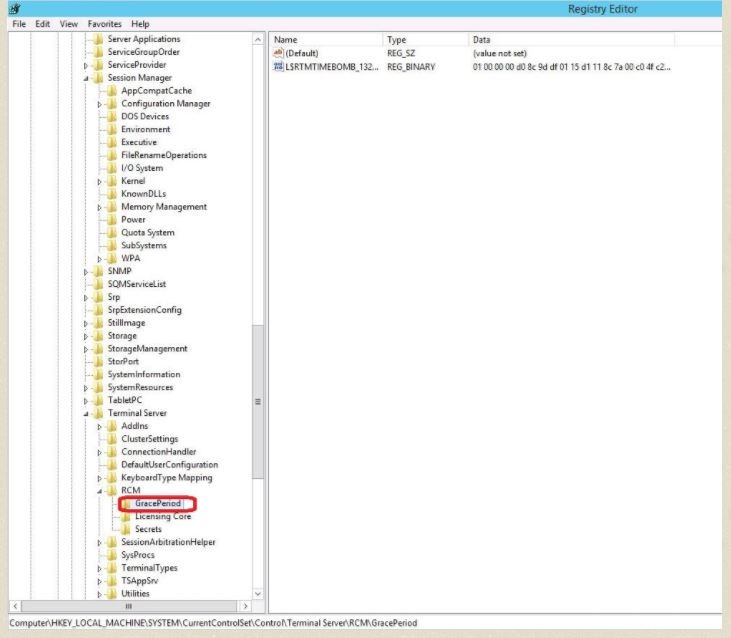
2. Navigate to HKEY_LOCAL_MACHINE\SYSTEM\CurrentControlSet\Control\Terminal Server\RCM\GracePeriod as shown in below window and select the GracePeriod Key. If the ‘GracePeriod’ key exists you will need to delete it.  

2.jpg
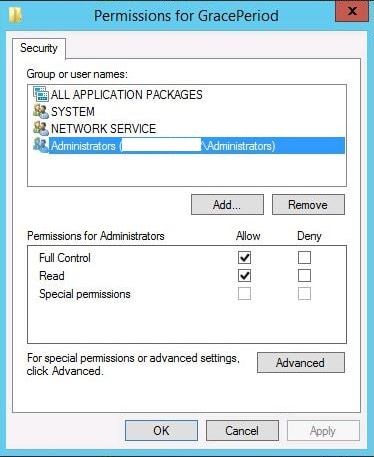
3. You must take ownership and give admin users full control to be able to delete GradePeriod key.

-  Right Click on GradePeriod Key to take ownership of.

-  On the Edit menu, click Permissions.

-  Click Advanced, and then click the Owner tab.

-  Under Change owner to, click the new owner, and then click OK.


3.jpg
Now, right click and delete the GracePeriod key( ‘REG_BINARY’ ). Once deleted, exit the registry and reboot the server.

Monday, 1 April 2019

TFGHT is compressed press CTRL+ALT+DEL to restart

Here is a method I picked up from some other thread:

1. Start your computer from the Windows 7 installation DVD or Repair CD.


2. Select Repair your computer.


3. Load driver.


4. Go to Computer and right click drive where Windows 7 is installed.


5. Select Properties and uncheck "Compress drive to save disk space".


6. Close and restart the computer normally.

Wednesday, 13 March 2019

Tally.ERP\9\Data\TranMgr.900 error

eror 'H:\tally9\11-12\10006\tranmgr.'
size 2180096
Position:2182144
chars 512 (done 0)


 Solution:-

First of all take the back up of tally data
2. Create a new folder under Data and rename with 5 digit number (Like 10002)
3. Copy the following files from corrupted data folder to newly created folder
Company.900
Linkmgr.900
Manager.900
Tranmgr.900
Cmpsave.900
4. Then go to run and execute the below command
C:\Tally.ERP9\tally.exe data 0
5. Then press Ctrl+Alt+R and click on YES at confirmation box. Then wait for complete the process