Friday, 29 June 2018

Speed up a Windows 10 System

The Microsoft Windows 10 operating system is quite efficient and performs well using default settings. However, it is possible to speed up Windows 10 even more and improve its performance. Try one or more of the following options to speed up your Windows 10 computer, as well as help reduce or eliminate potential errors.

Turn off shadowing and visual effects

Windows 10 includes some appealing look and feel features to program windows, text, icons, and other areas. While it may look nice and even flashy, it comes at a cost. Those features, otherwise known as shadowing and visual effects, use up system resources, which can cause Windows to run slower.
To turn off these resource draining features, follow the steps below.
  1. In the Search Windows text box, next to the Start button on the taskbar, type sysdm.cpl and press Enter.
  2. In the System Properties window, click the Advanced tab.
  3. On the Advanced tab, click the Settings button in the Performance section.
  4. In the Performance Options window, select the Adjust for best performance option, then click the OK button.
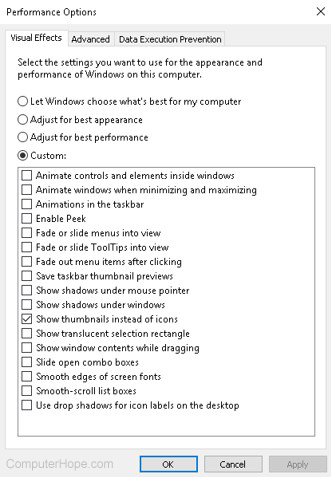
Windows 10 Performance Options
Tip: If you have picture files and like to see a thumbnail of that picture as the icon for the file, check the box for the Show thumbnails instead of icons option. Doing so will result in the Custom option being selected instead of the Adjust for best performance option, which is okay.

Adjust Windows power settings

Computers use power, that is no secret. However, how and where computers use power is not something commonly known. By default, the Windows operating system often utilizes a power plan that can result in slower computer performance. If you have a desktop computer, or a laptop computer connected to a power adapter, you can adjust the power plan used by Windows and increase the computer's performance.
Note: If you have a laptop computer and are using the battery instead of the power adapter, it is recommended that you do not adjust the power plan. The battery can be drained much faster if you adjust the power plan to allow for higher performance in Windows.
To view and adjust the power plan in Windows, follow the steps below.
  1. Open the Windows Control Panel.
  2. Find and click the Power Options utility.
  3. In the Power Options window, select the High performance power plan, then close the window.
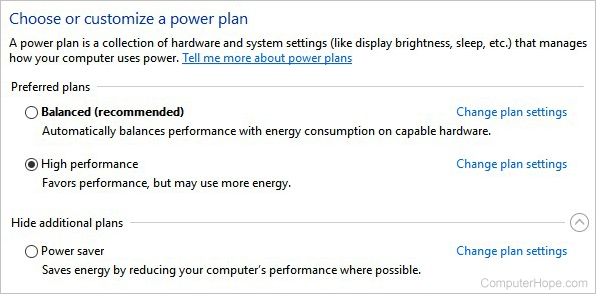
Windows power plan options
If you want to adjust or the settings of the High performance power plan, click the Change plan settings link next to that power plan option. You can adjust two power settings in the Edit Plan Settings window, or click the Change advanced power settings link to further adjust the power plan settings.

Run Windows System Maintenance

Windows 10 has a built-in maintenance utility that can help find and fix issues in the operating system. It can also identify and run processes that can help improve computer performance.
To access and use the Windows System Maintenance utility, follow the steps below.
  1. In the Search Windows text box, next to the Start button on the taskbar, type system maintenance, then press Enter.
  2. In the Security and Maintenance window, click the Troubleshooting link towards the bottom of the window.
  3. In the Troubleshooting window, under the System and security section, click the Run maintenance tasks link.
  4. Click the Next button to run the Troubleshooter utility. If a message appears saying to run the Troubleshooter as an administrator, click the Try troubleshooting as an administrator option.
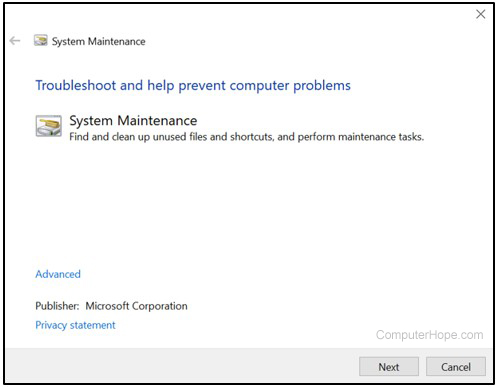
Windows Troubleshooter
  1. If any errors or issues are found, or any suggestions are provided, follow the steps to fix the errors and issues, and implement the suggestions.

Stop/remove TSRs and disable startup programs

Programs and processes that run in the background, known as TSRs, use up memory on the computer and can cause the computer to run more slowly than it could. Some of these programs and processes are not essential to the operating of the computer and Windows operating system, and they can be turned off.
To turn off and disable TSRs and other programs that startup with Windows, follow the steps provided on the web page linked below.
If you are unsure which programs and processes to turn off and disable, visit the Should I Block It website linked below and search for the name of the process or program. The Should I Block It website can help you determine if the process or program is needed or not for correct computer, Windows, or other software operation.

Clean the Windows registry

The Windows registry stores lots of information about the operating system, software, and files. If there is bad information, incorrect shortcuts to programs, or other problems, it can cause the computer to run slow. Issues in the registry can also cause errors, including blue screen of death errors.
Correcting problems in the registry can help to speed up a computer, allow it to run more efficiently, and eliminate errors. The registry is very complex and not something you want to fix manually, as it could cause even worse problems. Using a registry cleaner is a better option. Below are a couple registry cleaners that we recommend.
  • CCleaner - fixes many registry issues, and includes several additional tools to speed up a computer
  • EasyCleaner - a basic, but powerful registry cleaner
  • Glary Utilities - a powerful registry cleaner, and includes several additional tools to free up hard drive space and improve computer performance
Batch File Help and Support

Batch files allow MS-DOS and Microsoft Windows users to write a series of commands to run in order upon their execution for automating frequently performed tasks. For example, a batch file could be used to run frequently utilized commands, delete or move a series of files, and other jobs.
One of the earliest batch files was the autoexec.bat, which is a batch file that loaded each time computers with MS-DOS and early versions of Windows started. A simple batch file only requires a basic understanding of command line commands and does not need programming skills.

Batch file basics

Top batch file questions

All other batch file questions

Other MS-DOS and command line questions

How to clear an unknown BIOS or CMOS password


Note: The steps on this page are for a desktop computer and do not include steps on how to clear a laptop CMOS password.

Note: The steps on this page will not help with clearing a Windows password.

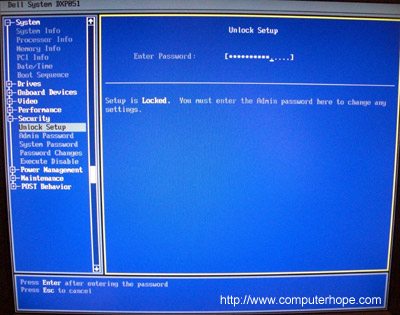
Sometimes, users encounter a password prompt at boot or the BIOS or CMOS setup is locked (as can be seen in the image below). If you do not know the BIOS password, you'll need to clear it. The following sections contain instructions on how to do so using multiple methods.
CMOS setup locked password screen

Clear using jumper (recommended)

Caution: When working inside a computer, be sure you're aware of the potential damage that can be caused by ESD.
Computer jumperOn the computer motherboard locate the BIOS clear or password jumper or dip switch and change its position. This jumper is often labeled CLEAR, CLEAR CMOS, JCMOS1, CLR, CLRPWD, PASSWD, PASSWORD, PSWD or PWD. To clear, remove the jumper from the two pins currently covers the replace it over the other two. An example of the various jumper positions may be seen in the image to the right. Some computers may also clear the password by keeping the jumper open (one or no pins covered).
What if I can't locate the CMOS password jumper?
The following list details the general locations for the CMOS jumper. It's important to realize that most motherboards have dozens of different jumpers, so you need to make sure you're changing the correct jumper. If you are unable to find the password jumper, consult your motherboard's documentation by looking in the manual or downloading it from the manufacturer's website.
  1. On the edge of the motherboard - Most jumpers are located on the side of the motherboard for easy accessibility; verify by looking at all visible edges of the motherboard.
  2. By the CMOS battery - Some manufactures place the jumper to clear the CMOS or BIOS password by the CMOS battery itself.
  3. By the processor - Some manufactures place the jumpers by the CPU of the computer.
  4. Under the keyboard or bottom of laptop - If you are working on a laptop, the location of the dip switch can be under the keyboard or on the bottom of the laptop. It is usually located in a compartment such as the one that contains memory. (Laptops almost always use dip switches, not jumpers.)
Once the appropriate jumper or dips switch has been located and toggled, the password should be cleared. Turn your machine on to verify that the password has bee reset. Once cleared, turn the computer off and return the jumper or dip switch to its original position.

Remove CMOS battery

CMOS batteryRemoving the CMOS battery like the one shown in the picture causes the system to lose all CMOS settings; including the password. To do this, locate and remove the CMOS battery from the motherboard for at least five minutes, then replace the battery and turn the computer back on.

Generic passwords

Try using generic CMOS passwords. It should be noted that many of these default passwords are for older motherboards and no longer work with newer machines.

Jump the CMOS solder beads

Older computers, especially older laptops, don't have jumpers or dip switches. They require the user to jump a pair of solder beads on a circuit board. The identification and location of these solder beads can vary and if not available in computer documentation, is only obtainable through the computer manufacturer.
If you've identified the solder beads, they can be jumped by placing a flat-head screwdriver over the two beads and leaving it on those beads while turning on the computer. Once the computer has booted, turn it off and then remove the screwdriver.

Contact manufacturer

If none of the previous sections resolved your issue, we recommend you contact the computer manufacturer or motherboard manufacturer for the steps on clearing the computer password. 


How to disable the Windows password prompt

How to disable the Windows password prompt

Windows password log on
As a rule of thumb, it's a good idea to have a password on your computer. Anyone who has physical access to your machine can view any unprotected data that is on it. However, if your computer is in a safe location (e.g., a home office) where no one else could easily access you may want to get rid of the Windows password prompt. To proceed, find your version of Windows in the sections below and follow the instructions.

Windows Vista, 7, 8, and 10 users

  1. Press the Windows key, type netplwiz, and then press Enter.
  2. In the window that appears, select the Users tab.
  3. In the Users for this computer: section, select the account for which you'd like to disable the windows startup password prompt.
  4. Uncheck the box next to Users must enter a username and password to use this computer.
  5. Click Apply.
  6. In the window that appears, enter the account's current password twice and click OK.
  7. That window should close. Click OK at the bottom of the User Accounts window.
The next time you turn on the computer, the password prompt should be gone for this computer.

Windows XP users

  1. In the lower left-hand corner of the Windows desktop, click the Start button.
  2. Click on Run... A box should appear similar to the one below.
Windows XP Run box
  1. Next to Open, type netplwiz, and then press Enter or click OK.
  2. In the window that appears, select the Users tab.
  3. In the Users for this computer: section, select the account for which you'd like to disable the windows startup password prompt.
  4. Uncheck the box next to Users must enter a username and password to use this computer.
  5. Click Apply.
  6. In the window that appears, enter the account's current password twice and click OK.
  7. That window should close. Click OK at the bottom of the User Accounts window.
The next time you turn on the computer, the password prompt should be gone for this computer.


change username or password for all OS?

  change username or password for all OS?

Below are the steps on how to change your username or password in major operating systems, online services, and other locations.
Note: Keep in mind that unless you are the administrator or root of the system, you need to know the password of the account before changing it into something else.

Changing the username and password in Windows 10

Change password
  1. Click the Start button or press the start button on your keyboard.
  2. Type sign and then click on Sign-in options
  3. In the Password section, click on the Change button.
Change username
  1. Open Control Panel.
  2. Select User Accounts.
  3. Click Change your account name
Note: Changing the account name only works for local accounts and not Microsoft accounts.

Changing the username and password in Windows 8

Windows 8 Charms menuChange password
  1. Open the Charms menu by pressing the "Windows key" plus the "C" key and select Settings.
  2. In Settings, select Change PC settings.
  3. In PC Settings, select Users.
  4. Select the Change your password option to change the password for your local Windows account.
Change username
  1. From the Windows Desktop, open the Charms menu by pressing the "Windows key" plus the "C" key and select Settings.
  2. In Settings, select Control Panel.
  3. Select User Accounts.
  4. In the User Accounts window, select Change your account name to change the username for your local Windows account.

Changing the username and password in Windows Vista and 7

Change password
  1. Open Control Panel.
  2. Click Add or remove user accounts.
  3. Click the account you want to change.
  4. Click Change the password
Change username
  1. Open Control Panel.
  2. Click Add or remove user accounts.
  3. Click the account you want to change.
  4. Click Change the account name

Changing the username and password in Windows XP

Change password
  1. Open Control Panel.
  2. Double-click the Users Accounts icon.
  3. Select the account you want to change.
  4. Select the option "Change my name" to change your username or "Create a password" or "Change my password" to change your password.
Note: Windows XP Home users can only change the administrator password through Safe Mode.
Change username
  1. Open Control Panel.
  2. Double-click the Users Accounts icon.
  3. Select the account you want to change.
  4. Click "Change My Name"
  5. Enter the new name you want to use and click the Change Name button.

Changing the username and password in Windows 2000

Change password
Microsoft Windows 2000 users can change their username by pressing Ctrl+Alt+Del while in Windows to open the Windows Security window. From this window, click the "Change Password" button.
Enter your old password and the new password you want to use.
Change username
To change the username of an account on Windows XP, you need to have an account with administrator rights. If you are logged in as administrator or have an account with administrator rights, follow the steps below.
  1. Open Control Panel.
  2. Double-click the Users and Password icon.
  3. Make sure "Users must enter a user and password to use this computer" is checked.
  4. Highlight the account you want to change the username for and click the Properties button.
  5. Within the Properties, you can change the Username.

Changing the username and password in Windows 95, 98, and ME

Change password
To change your password or password settings in Windows 95, 98, or ME, follow the steps below.
  1. Open Control Panel.
  2. Double-click the Passwords icon.
  3. In the Password Properties window, click the Change Windows Password button.
Note: The Windows password can also be changed through the Users icon in Control Panel.
Change username
You can change the user settings in Windows 95/98 through the Users icon in Control Panel. However, this does not allow you to change the actual username. If you need to change the username, we suggest you create a copy of your existing username and use the new username. Below are the steps to do this.
  1. Open Control Panel.
  2. Double-click the Users icon.
  3. Highlight the user you want to make a copy of and click the Make a copy button.
  4. Follow the wizard in creating a new user account.

Changing the username and password in Apple macOS X

macOS X 10.6 or later - Change password
  1. Log in using an administrator account.
  2. In the Apple menu, select System Preferences.
  3. In the View menu, select Users & Groups.
  4. You may need to click the lock button if it appears to be locked. Enter the administrator password.
  5. Select the user account you want to change.
  6. Click Reset Password or Change Password.
  7. In the New Password and Verify fields, type in the new password.
  8. After entering the new password, click the Reset Password or Change Password button again.
macOS X 10.3 to 10.5.8 - Change password
  1. Log in using an administrator account.
  2. In the Apple menu, select System Preferences.
  3. In the View menu, select Accounts.
  4. You may need to click the lock button if it appears to be locked. Enter the administrator password.
  5. Select the user account you want to change.
  6. Click Reset Password or Change Password.
  7. In the New Password and Verify fields, type in the new password.
  8. After entering the new password, click the Reset Password or Change Password button again.
  9. If a dialog window pops up, click OK.
macOS X 10.2 to 10.2.8 - Change password
  1. Log in using an administrator account.
  2. In the Apple menu, select System Preferences.
  3. In the View menu, select Accounts.
  4. You may need to click the lock button if it appears to be locked.
  5. Select the user account you want to change.
  6. Select the Edit User option.
  7. In the New Password and Verify fields, type in the new password and click OK.
  8. If a dialog window pops up, click OK.
macOS X 10.1.5 or earlier - Change password
  1. Log in using an administrator account.
  2. In the Apple menu, select System Preferences.
  3. In the View menu, select Users.
  4. You may need to click the lock button if it appears to be locked.
  5. Select the user account you want to change.
  6. Select the Edit User option.
  7. In the New Password and Verify fields, type in the new password and click Save.

Changing the Apple iPad passcode

Change passcode
  1. On the iPad, go to Settings.
  2. Select General.
  3. Select Passcode Lock.
  4. Select Change Passcode.

Changing the username and password in Linux and Unix and most variants

Change password
Almost all Linux and Unix and variants have access to the passwd command. Enter this command at the prompt to change your password. You need to know the current password before being able to change the password to a new password.
See the passwd command page for additional information about this command.
Change username
To change the username, you need to have root or super-user access.
To change the username of an account, use the vipw command. See the vipw command page for additional information about this command.
To change the user settings, use the chfn command. See the chfn command page for additional information about this command.

Changing BIOS passwords

Change password
The system password that appears immediately after turning on the computer and CMOS or BIOS password are both changed through the CMOS Setup.
Change username
The computer BIOS does not have a username, only a password.

Changing Internet username and passwords

Changing your Internet username or password is based on your Internet Service Provider (ISP) and what their policy is for changing the username and password. Often, most ISPs allow you to change your password whenever it's needed. However, they typically do not allow the account username to be changed.
Because every Internet Service Provider and web host is different, we suggest you contact the company for additional help with changing your username or password.

Changing online forums and accounts

Like the Computer Hope forums, most forums allow the user to change their password only through the profile or account settings. However, most companies do not allow you to change your username. Usually, you must create a new account to do this. If you need additional help with changing your username or password on another website, we suggest you contact the company or webmaster in control of that website.
If you are unable to access an online account because you do not know the username or password, look for a link on the account login page for retrieving a forgotten username or password. This option may be able to help in determining what your username or password is or help in resetting your account password.